

 Saparga account guide for carriers and drivers · saparga.kz/en/guide
Your Saparga account — simple, step by step
A guide for carriers and drivers: how to sign in, add drivers, buses and trips, see passengers and sales, and how to check tickets at boarding.
Account address: saparga.kz/cabinet
0Signing in
The account opens in an ordinary browser — on a computer or a phone. There is nothing to install.
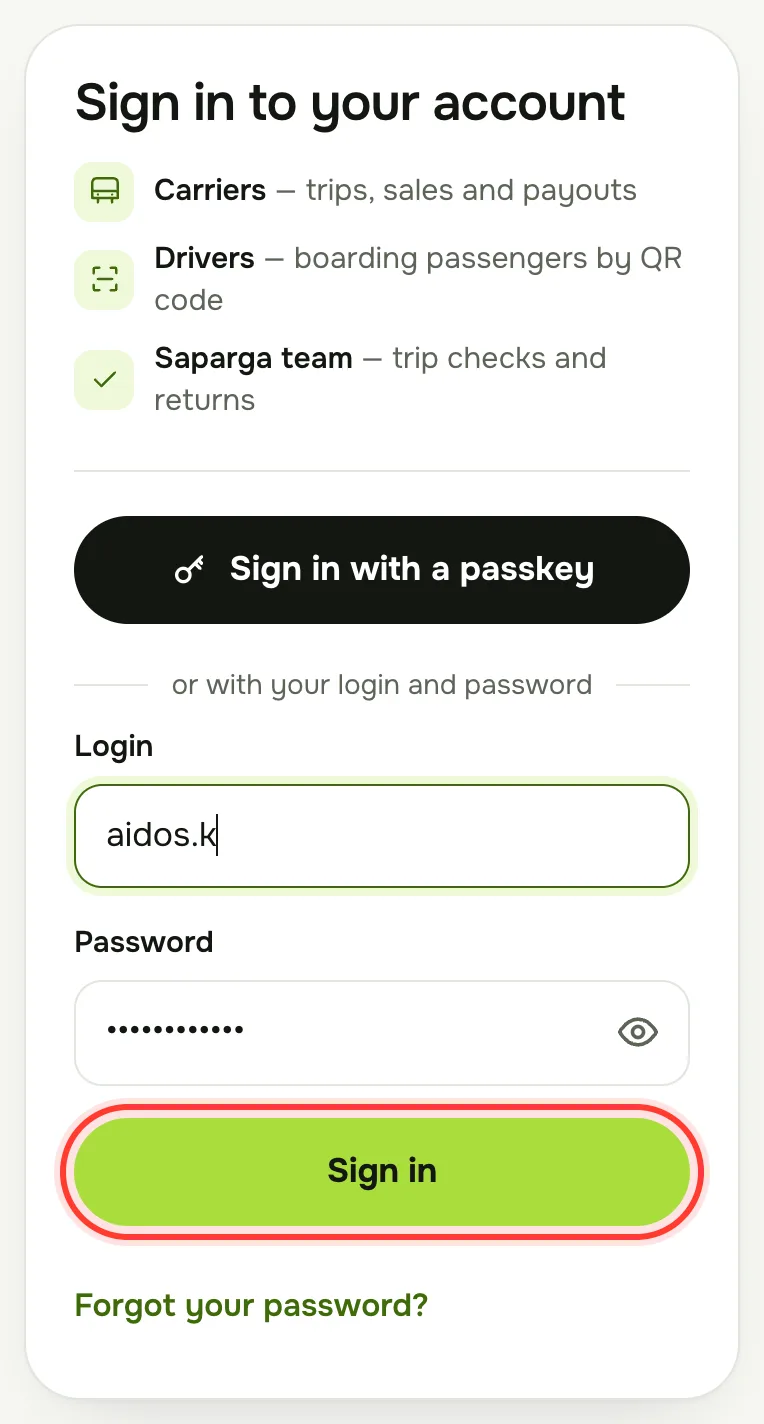
- Open saparga.kz/cabinet (or press “Sign in” on the “For carriers” page).
- Enter your Login and Password and press “Sign in”. The eye icon on the right shows the password so you can check it is typed correctly.
- Carriers get their login and password from the Saparga team; drivers get theirs from their carrier. They are handed over in person — we never send them by email.
- Added a passkey (see “Sign in with Face ID or a fingerprint”)? Press “Sign in with a passkey” and confirm with Face ID, a fingerprint or your phone's code — no login or password to type.
- Drivers can also sign in with a QR code shown by their carrier (see “Driver sign-in with a QR code”).
- Capital and small letters don't matter in the login, but they do in the password.
- After several wrong attempts, signing in is blocked for a while — wait as many minutes as the message says.
- The account keeps you signed in for 7 days. If you don't use it for 12 hours, you need to sign in again.
- Change the language (қазақша, русский, English) with the globe button at the top. To leave — “Sign out” (on a computer at the top right, on a phone in “Profile”).
Your first password is temporary. Change it in “Profile” right after signing in (see below).
Carrier account
The carrier menu has five sections: “Home”, “Trips”, “Drivers”, “Finance” and “Profile”. The bus list is in “Drivers”, on the “Buses” tab. On a phone the menu is at the bottom of the screen.
C1Home
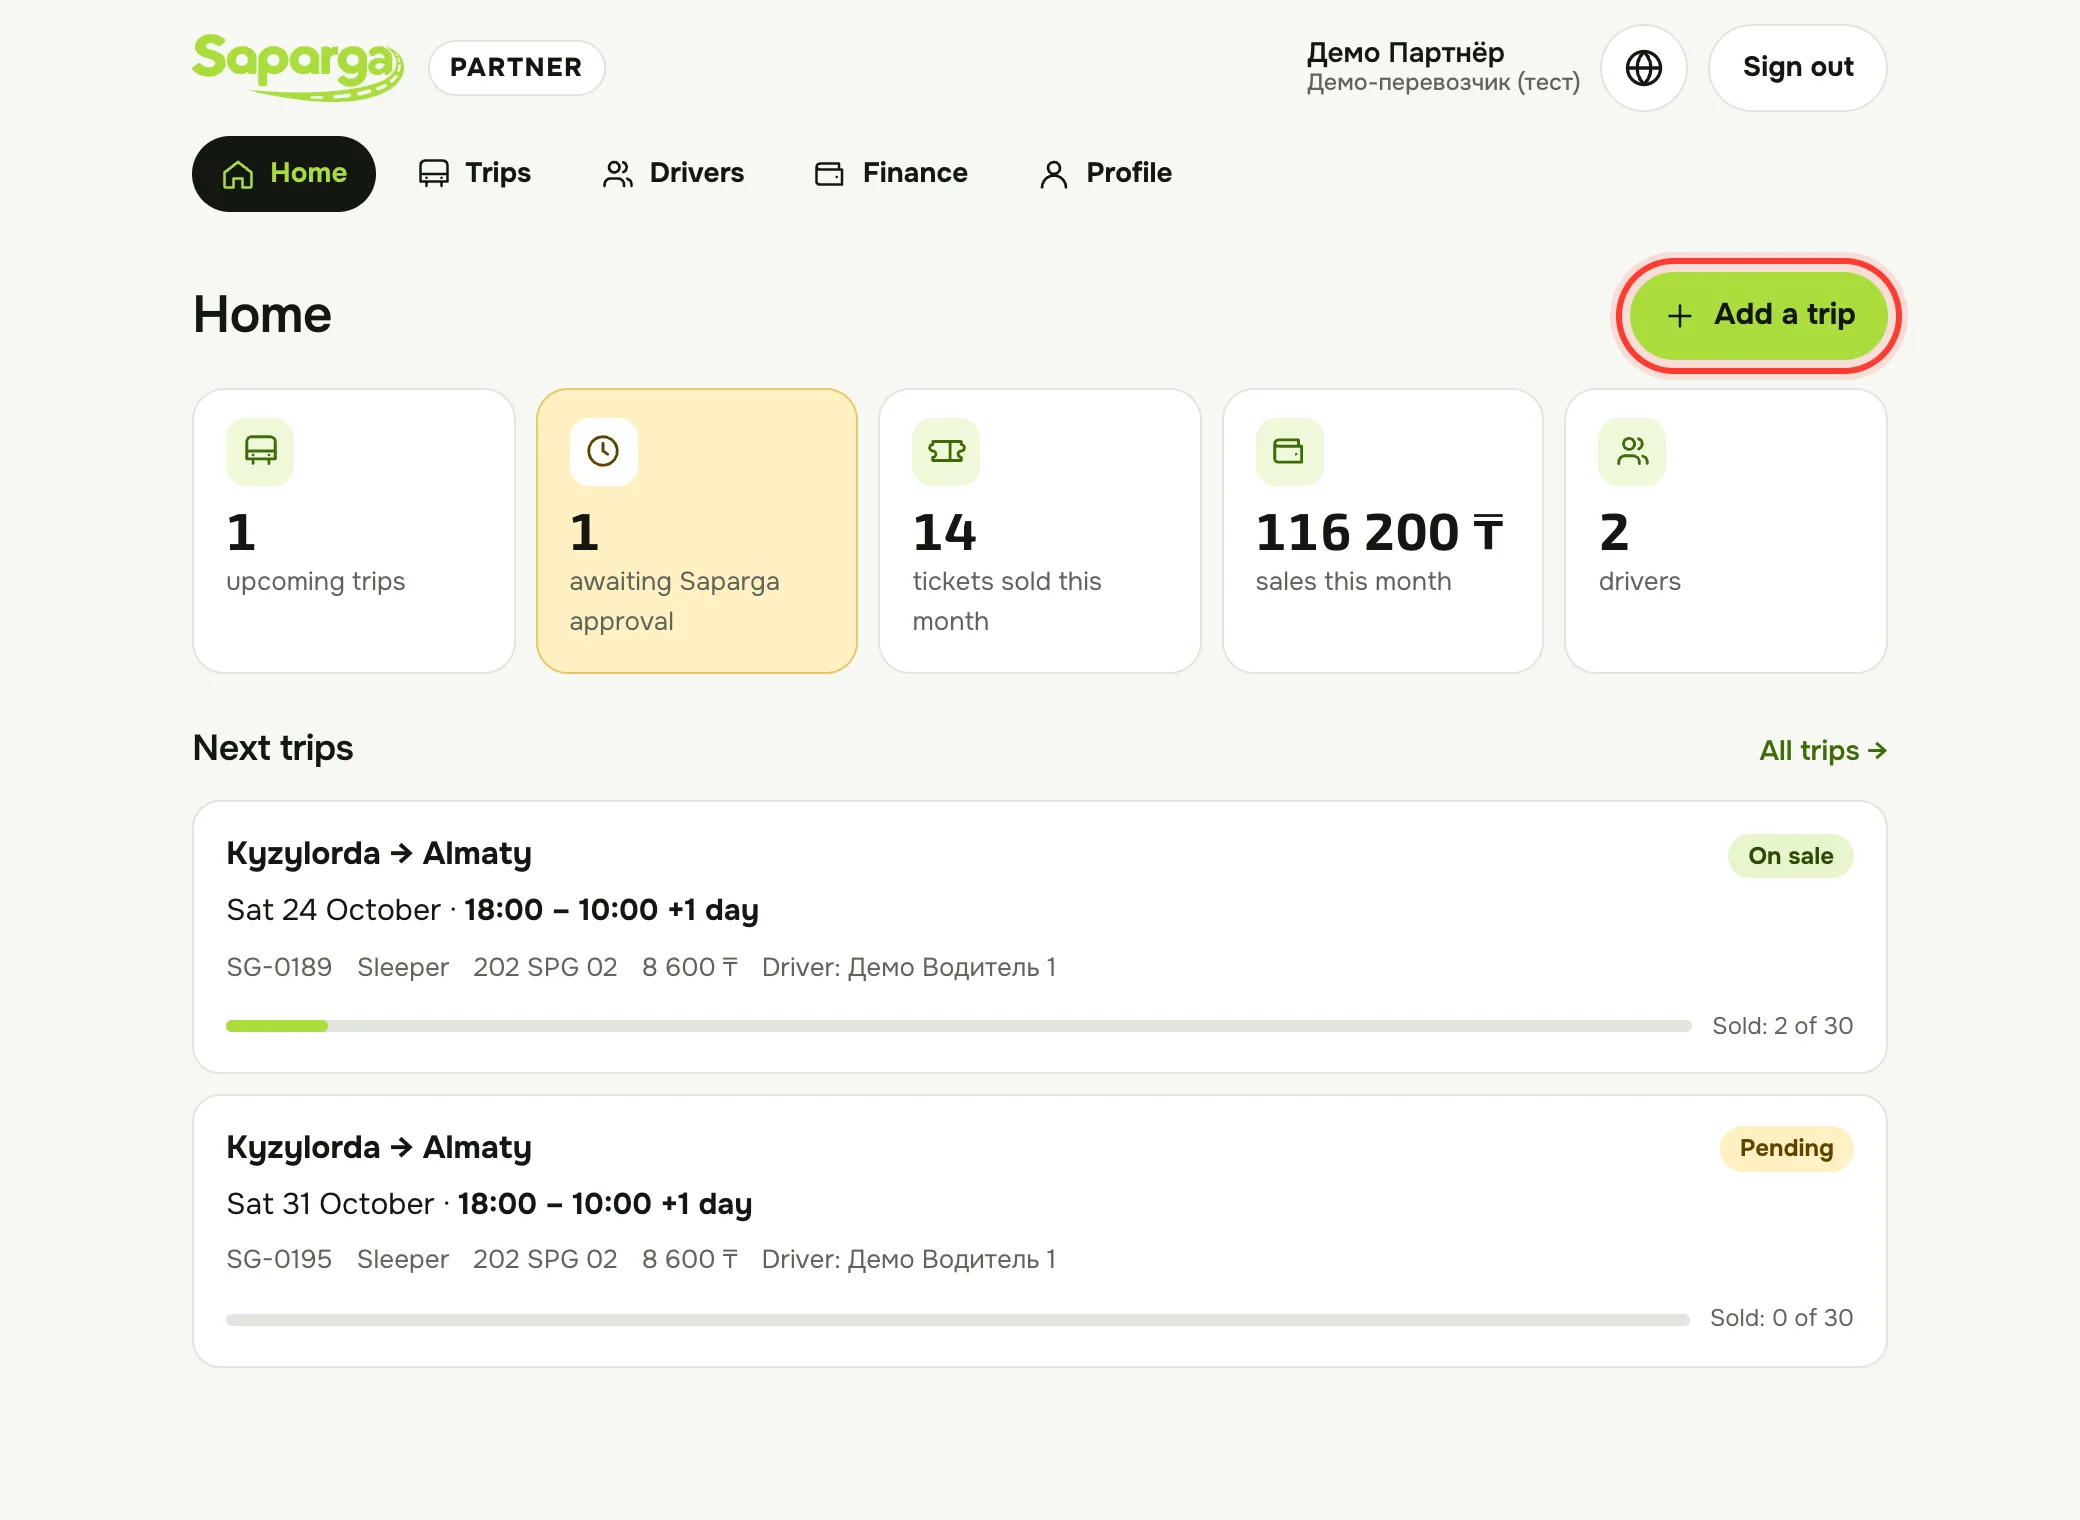
Right after signing in you see your company at a glance.
- upcoming trips — trips on sale that haven't finished yet;
- awaiting Saparga approval — new trips being checked (the tile is yellow while there are any);
- tickets sold this month and sales this month;
- drivers — how many drivers are active.
- Below — “Next trips”: date, time, bus, driver and how many seats are sold. Tap any tile or trip to open it.
C2Add a driver
Add at least one driver first — a trip can't be created without one.
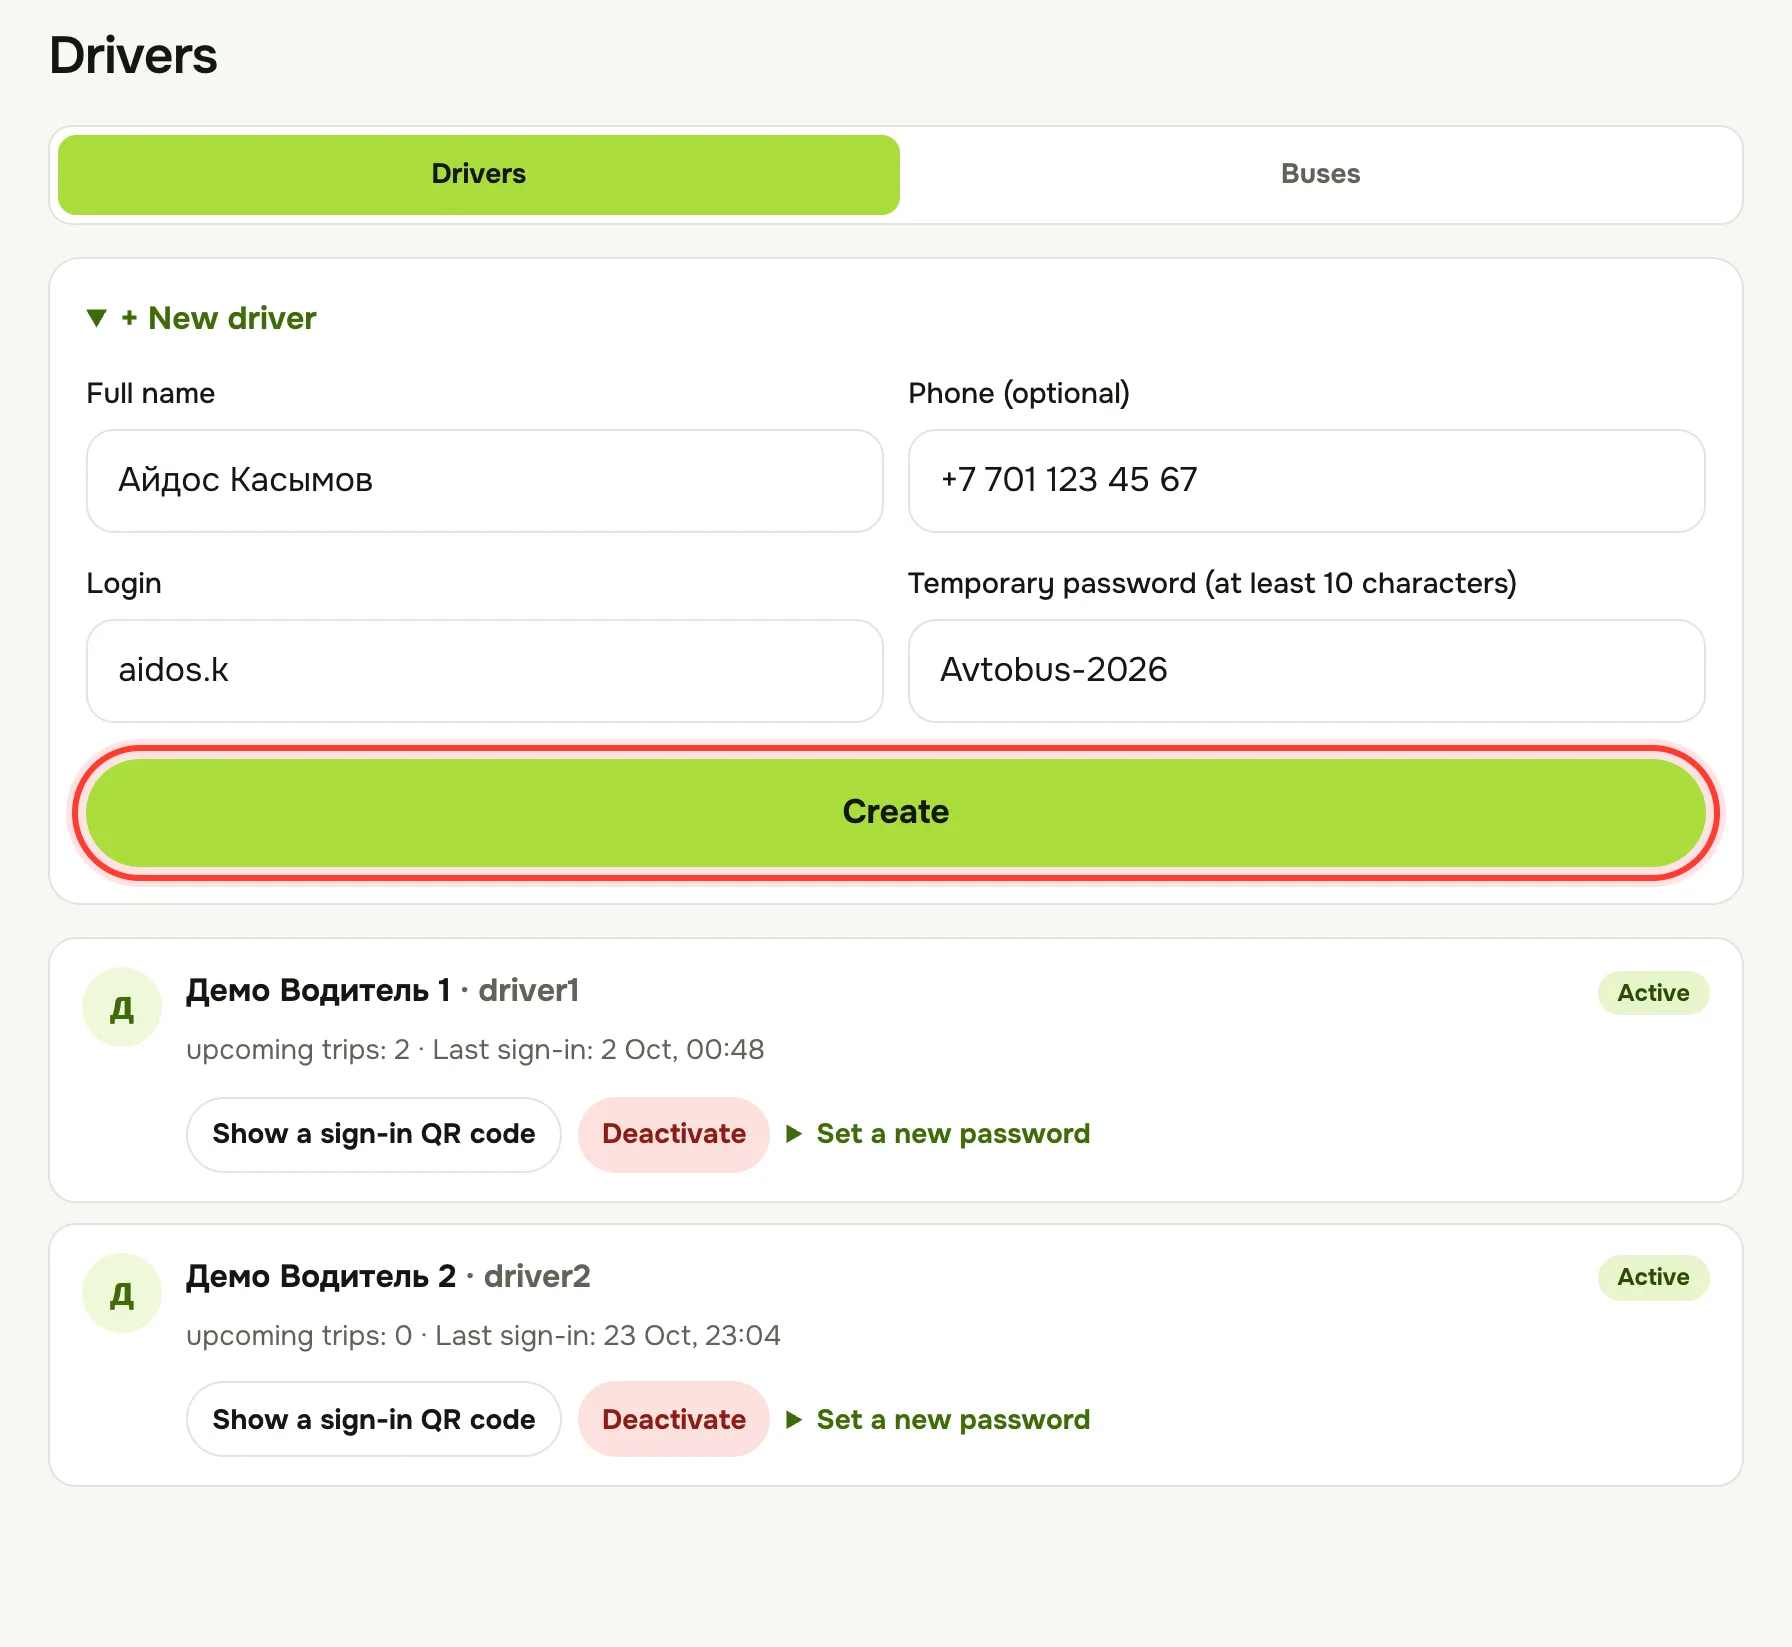
- Open “Drivers” and press “+ New driver”.
- Fill in Full name, Phone (optional), Login and Temporary password (at least 10 characters).
- Press “Create”. You'll see the message “Driver … added”.
- Give the driver the login and password in person. The password isn't shown anywhere again — write it down before pressing “Create”.
- Login: 3–32 characters — Latin letters, digits, dot, hyphen or underscore (e.g. aidos.k). The login must not be taken.
- A driver sees only their own trips: schedule, boarding and passenger list.
C3Deactivate a driver or set a new password
A driver can't be deleted (their trip history is kept), but can be deactivated in one tap.
- In “Drivers”, find the driver.
- “Deactivate” — the driver loses access at once and all their sessions end. To give access back — “Activate”.
- “Set a new password” — if the driver forgot their password. Type a new password, press “Save”, then give it to the driver.
- Under the name you see how many upcoming trips the driver has and when they last signed in.
- A deactivated driver stays on trips already created but can't be picked for new ones. Before deactivating, check the card for upcoming trips.
“Deactivate” works immediately, without asking again.

C4Driver sign-in with a QR code
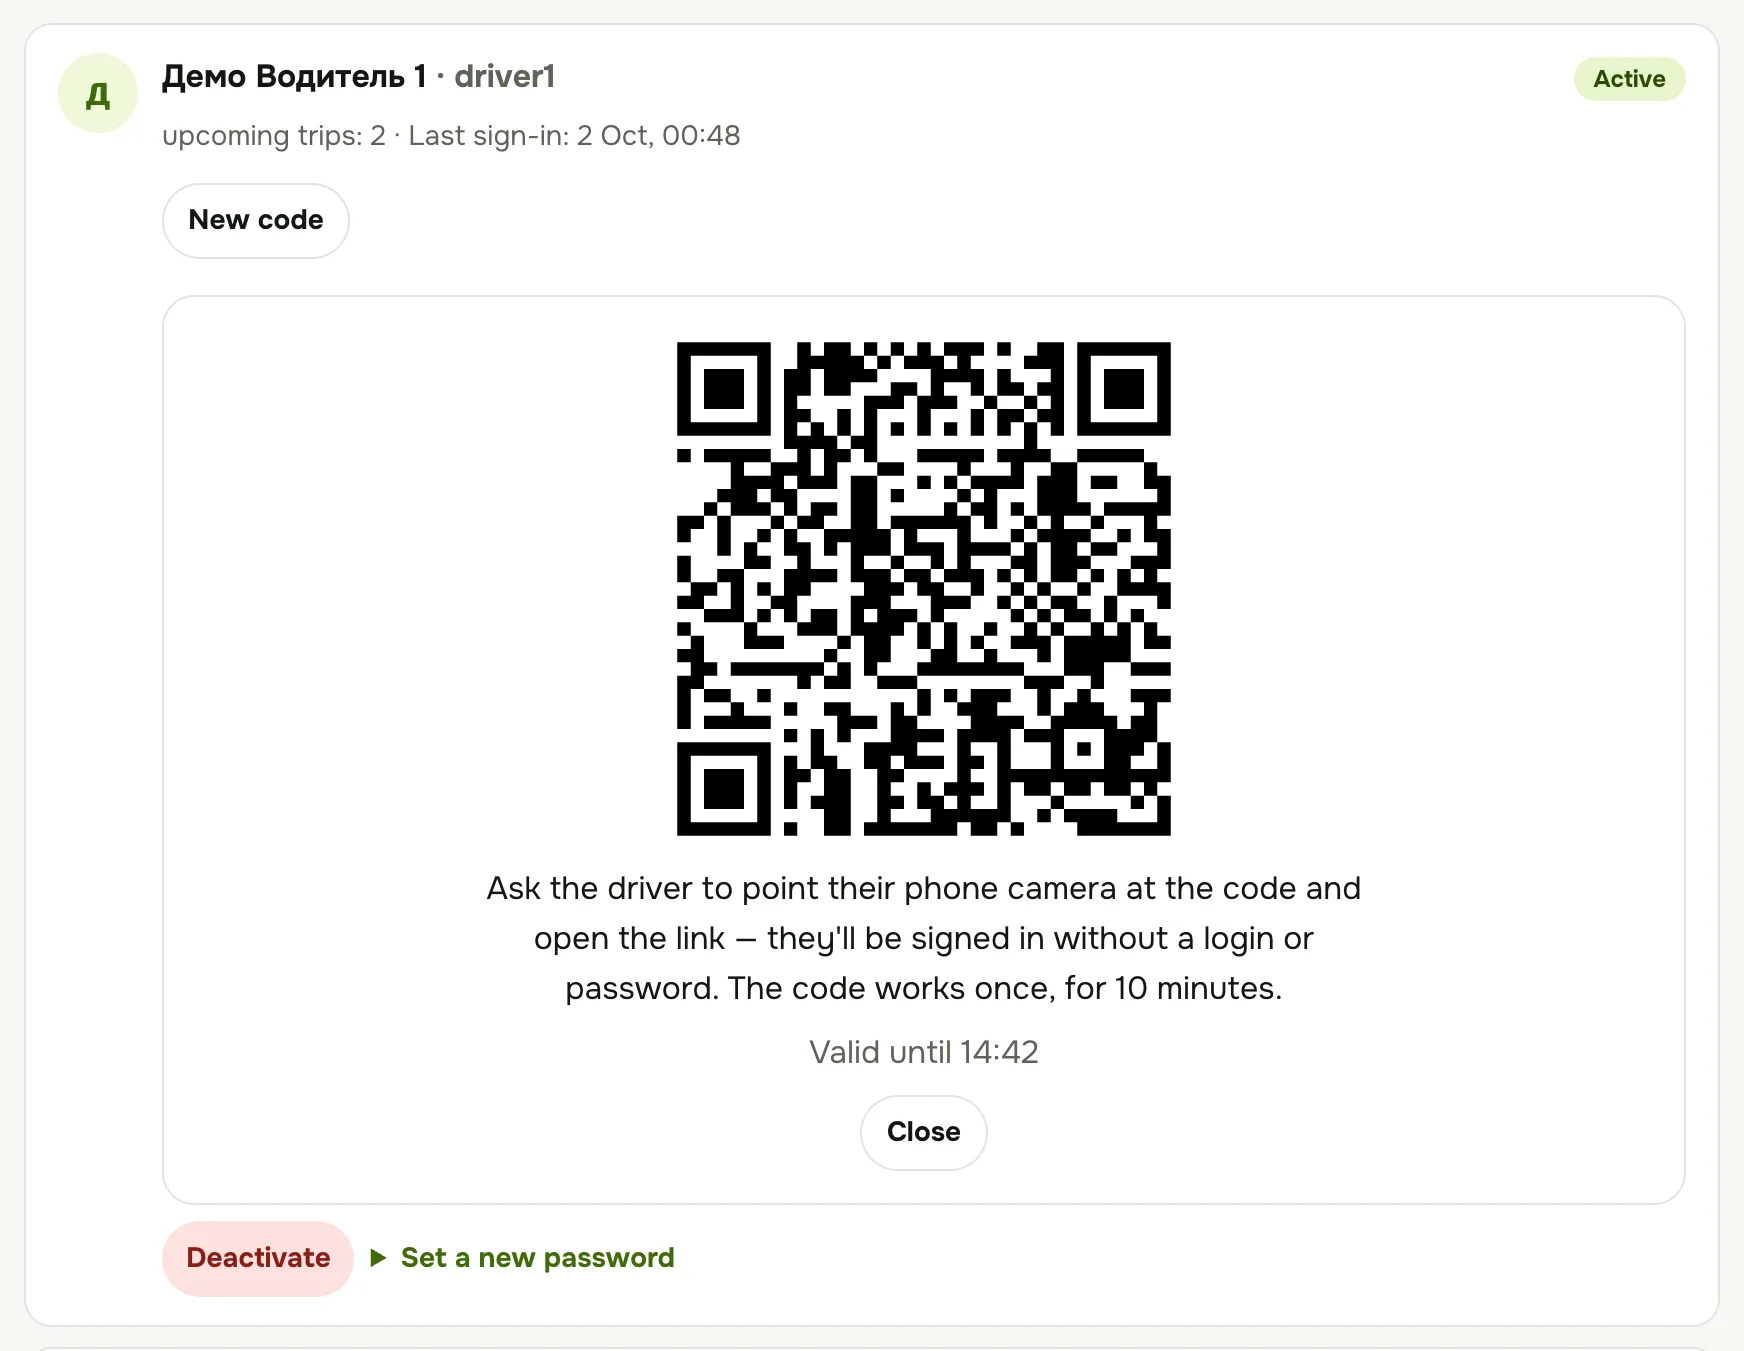
Drivers don't need to remember a login and password: show them a QR code on your screen and they sign in from their phone.
- In “Drivers”, press “Show a sign-in QR code” next to the driver.
- The driver points their phone camera at the code and opens the link.
- The page that opens shows the driver's name — they press “Sign in” and are taken straight to their account.
- To hide the code, press “Close”.
- The code works once and for 10 minutes — the time is shown under the code. If it runs out, press “New code”.
- A new code cancels the previous unused one straight away.
- Show the code only to your own driver: whoever opens the link first signs in as that driver.
- There is no such button for a deactivated driver.
C5Buses
Add your buses once — when creating a trip you just pick a bus from the list, no need to type the plate number again.
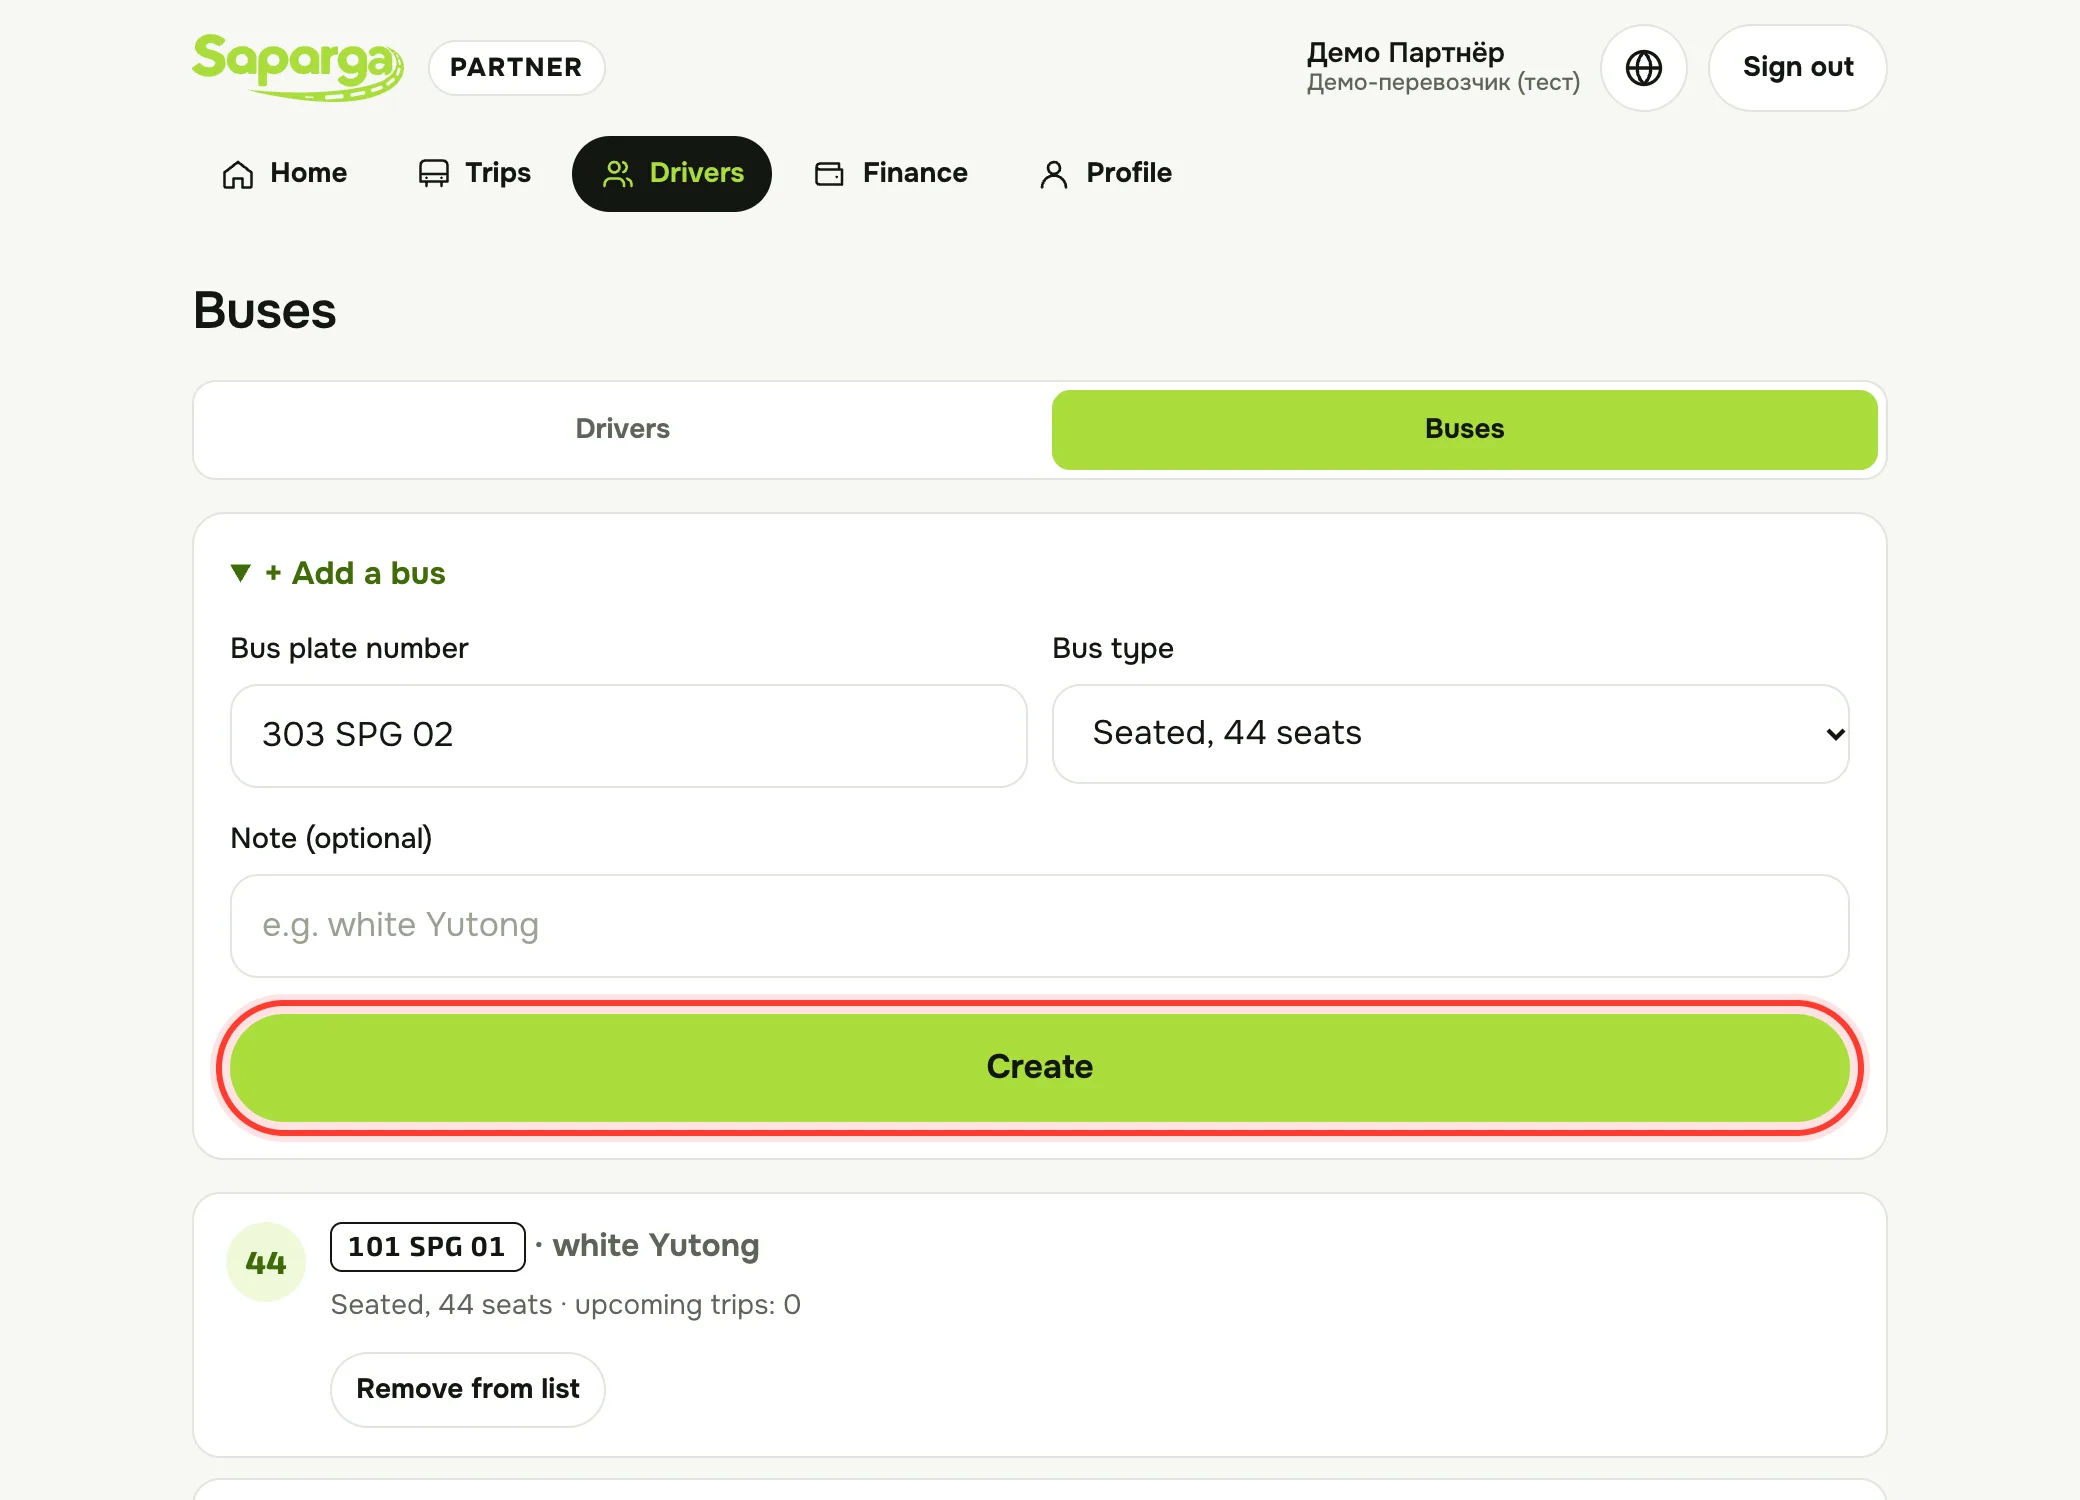
- Open “Drivers” and switch to the “Buses” tab.
- Press “+ Add a bus”.
- Enter the Bus plate number in Latin letters, e.g. 123 ABC 01, and choose the Bus type — “Seated, 44 seats” or “Sleeper cabin, 30 berths (15 lower + 15 upper)”.
- Note — optional, to tell your buses apart (e.g. “white Yutong”).
- Press “Create”. The bus appears in the list.
- Under each bus you see how many upcoming trips it has.
- A bus that no longer runs can be taken off with “Remove from list” — trips already created don't change. To bring it back — “Back to list”.
- The same plate number can't be added twice.
- Passengers see the plate number in search results and on their ticket — that's how they find the right bus at boarding.
C6Add a trip
A trip is one journey of a bus on a given day. Trips on several dates can be created in one go.
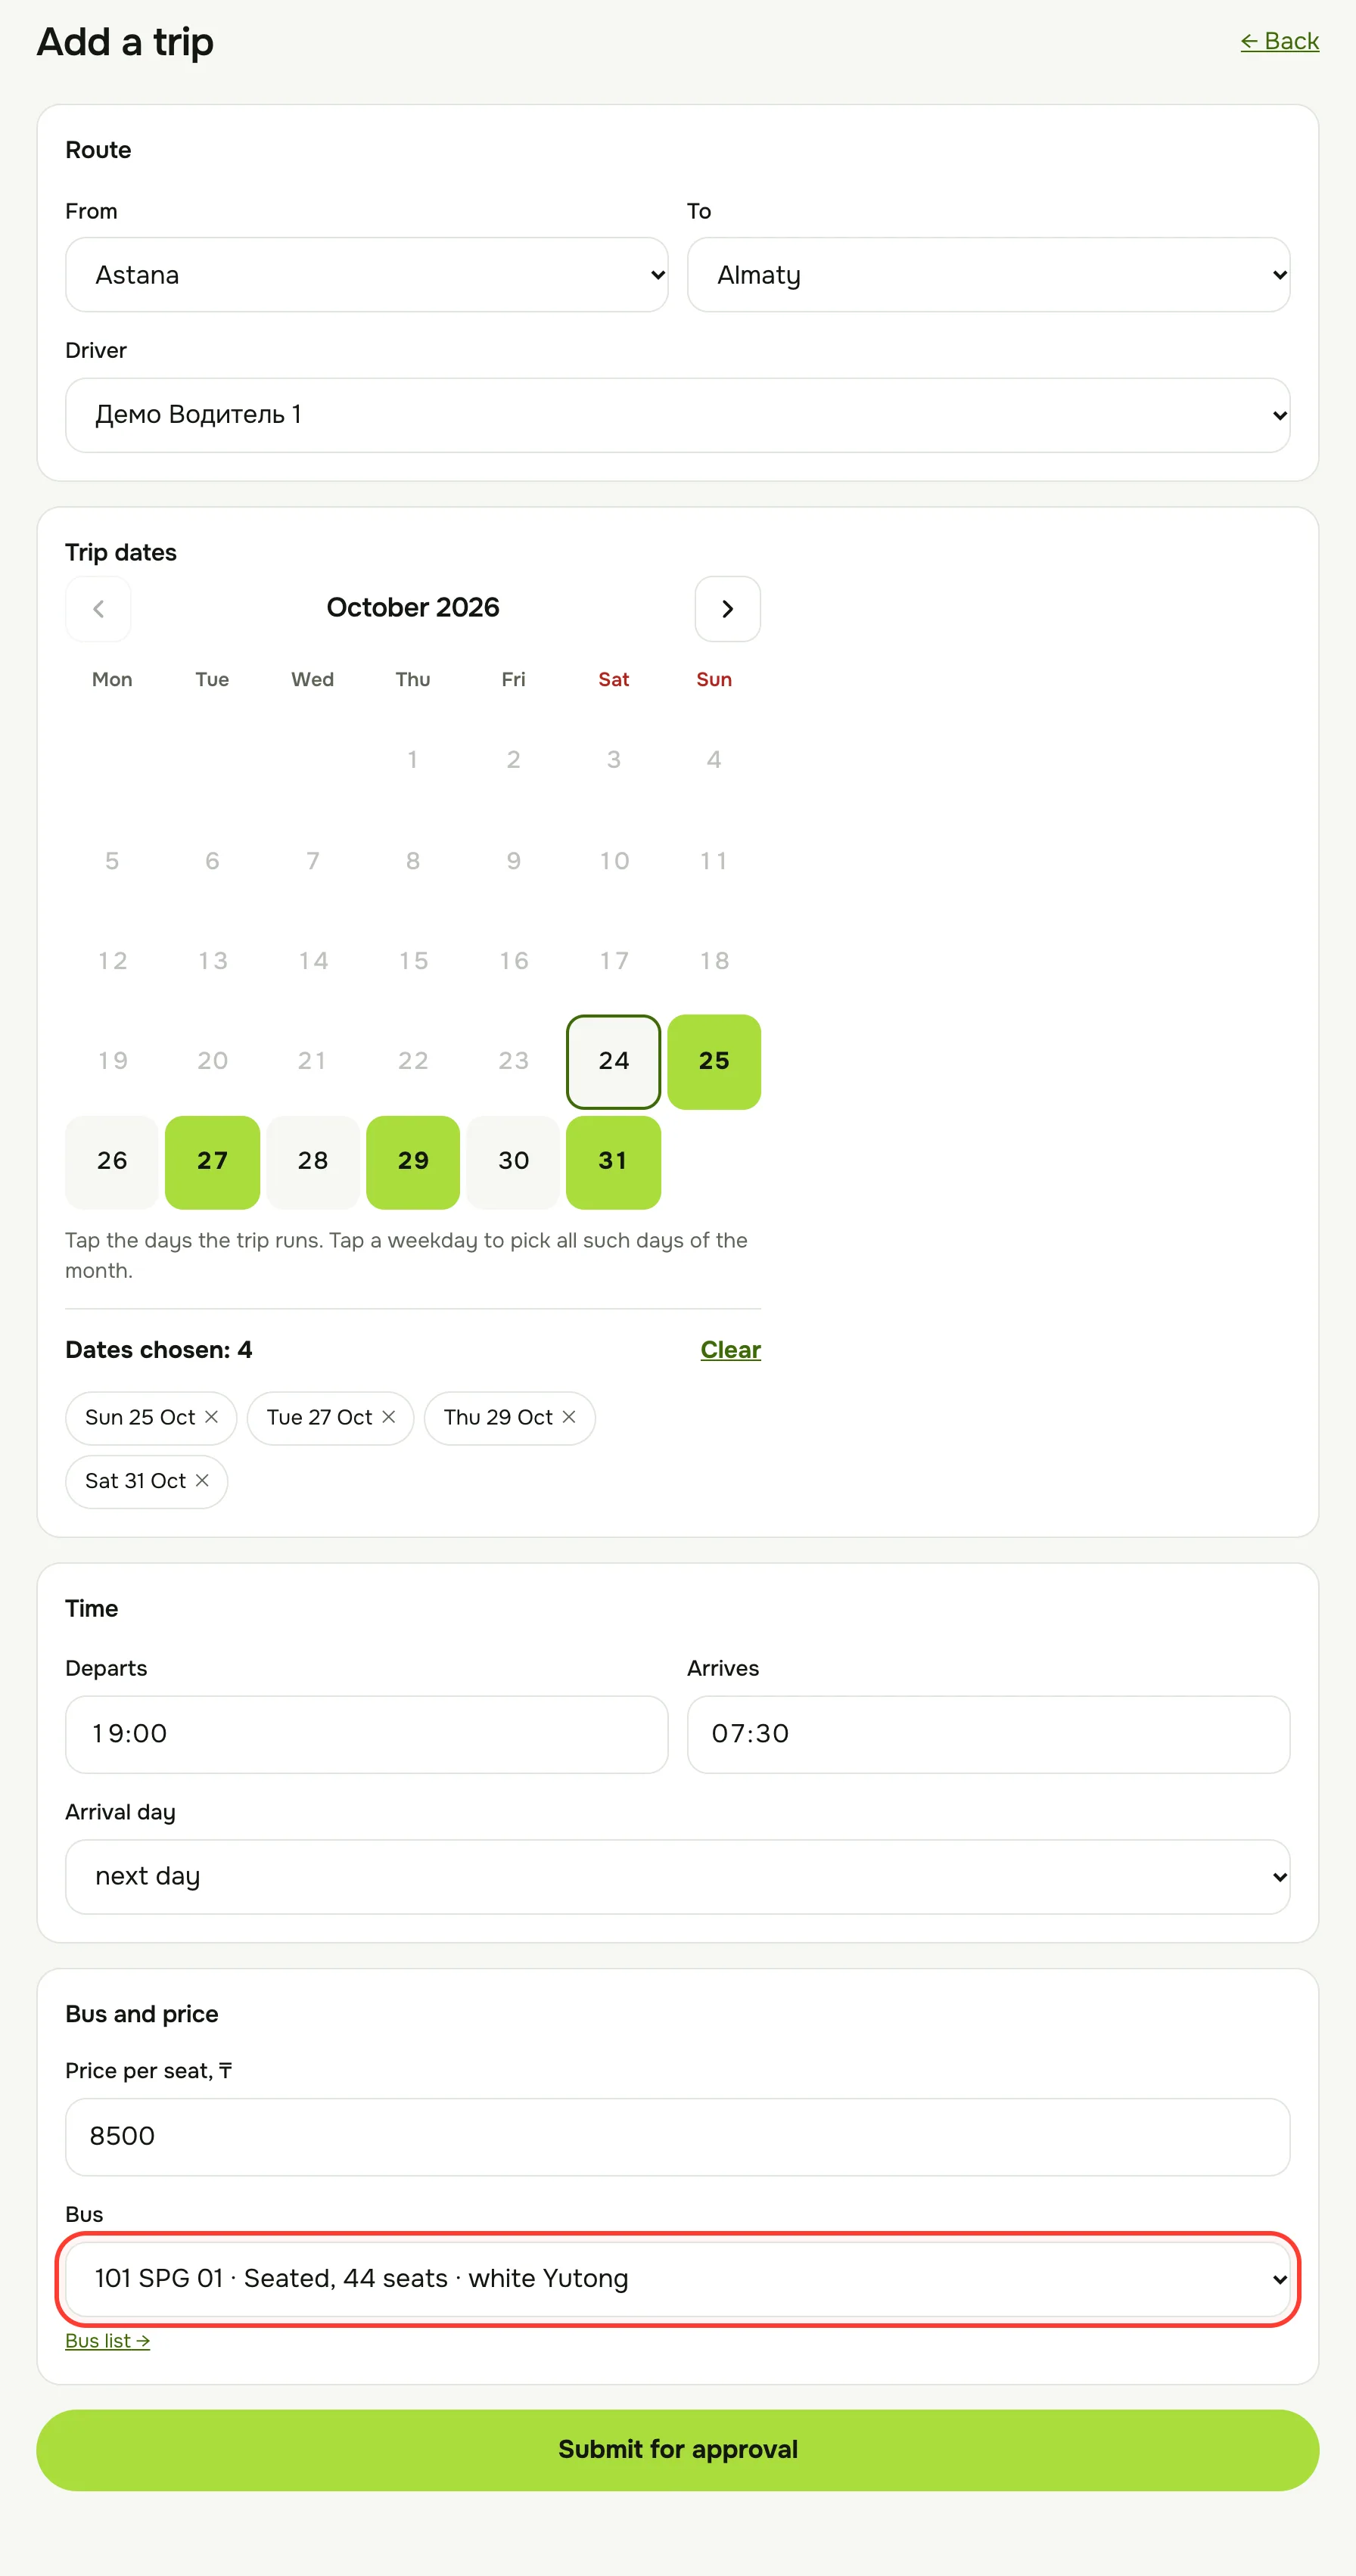
- Press “+ Add a trip” on the home page or in “Trips”.
- Route: choose From, To and the Driver.
- Trip dates: tap the days on the calendar when the trip runs. Tapping a weekday name (e.g. “Fri”) picks every such day of the month. The chosen dates appear under the calendar — remove any extra one with its cross.
- Time: set the Departs and Arrives times (Kazakhstan time, 24-hour format) and the Arrival day — “same day”, “next day” or “in 2 days”.
- Bus and price: enter the Price per seat in tenge and pick the Bus from your list — the plate number and type are filled in for you.
- Bus not on the list? Choose “Another bus…”, set the Bus type and Bus plate number (Latin letters, e.g. 123 ABC 01). The tick “Save this bus to the list” adds it to the list for next time.
- Press “Submit for approval”.
- The bus list shows only your company's buses. To add or remove a bus — the “Bus list” link under the form, or the “Buses” tab in “Drivers”.
- Price — from 100 to 500,000 ₸, a whole number.
- Up to 62 dates can be picked at once.
- Same trip on new dates: open the earlier trip and press “Repeat trip” — the form fills itself in, you only pick the dates.
- If something is filled in wrongly, a hint appears under the form — fix it and submit again.
Check everything before submitting: a submitted trip can't be edited. If you made a mistake, withdraw it (see “Withdraw a trip”) and create it again.
C7Saparga approval and trip statuses
Every new trip is checked by the Saparga team first. It appears on the website only after approval.
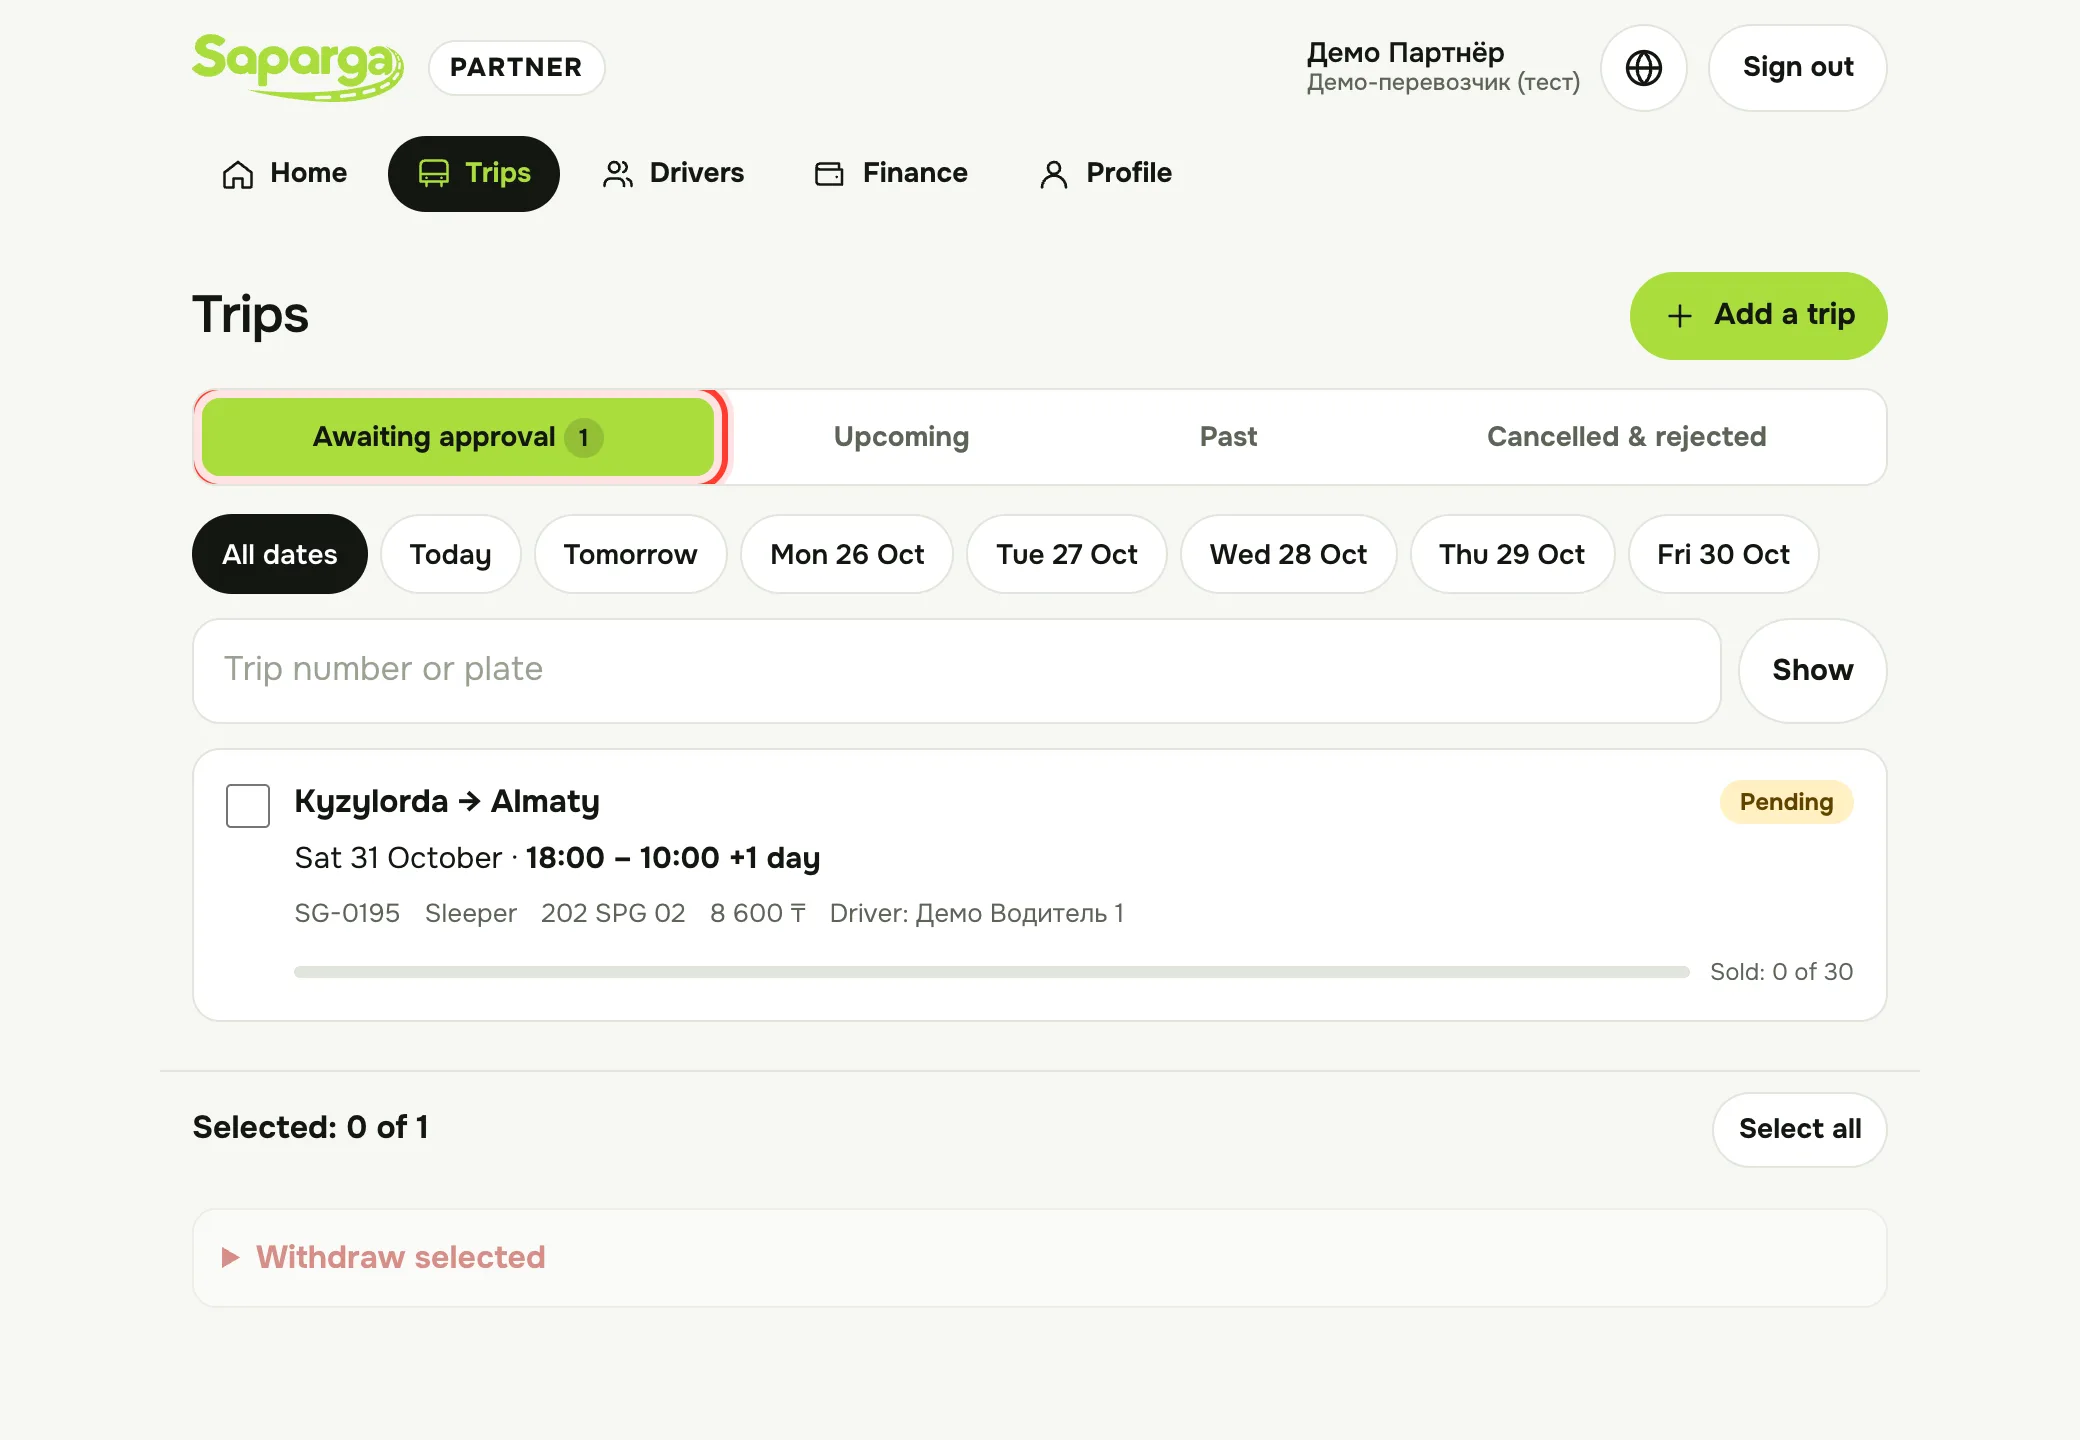
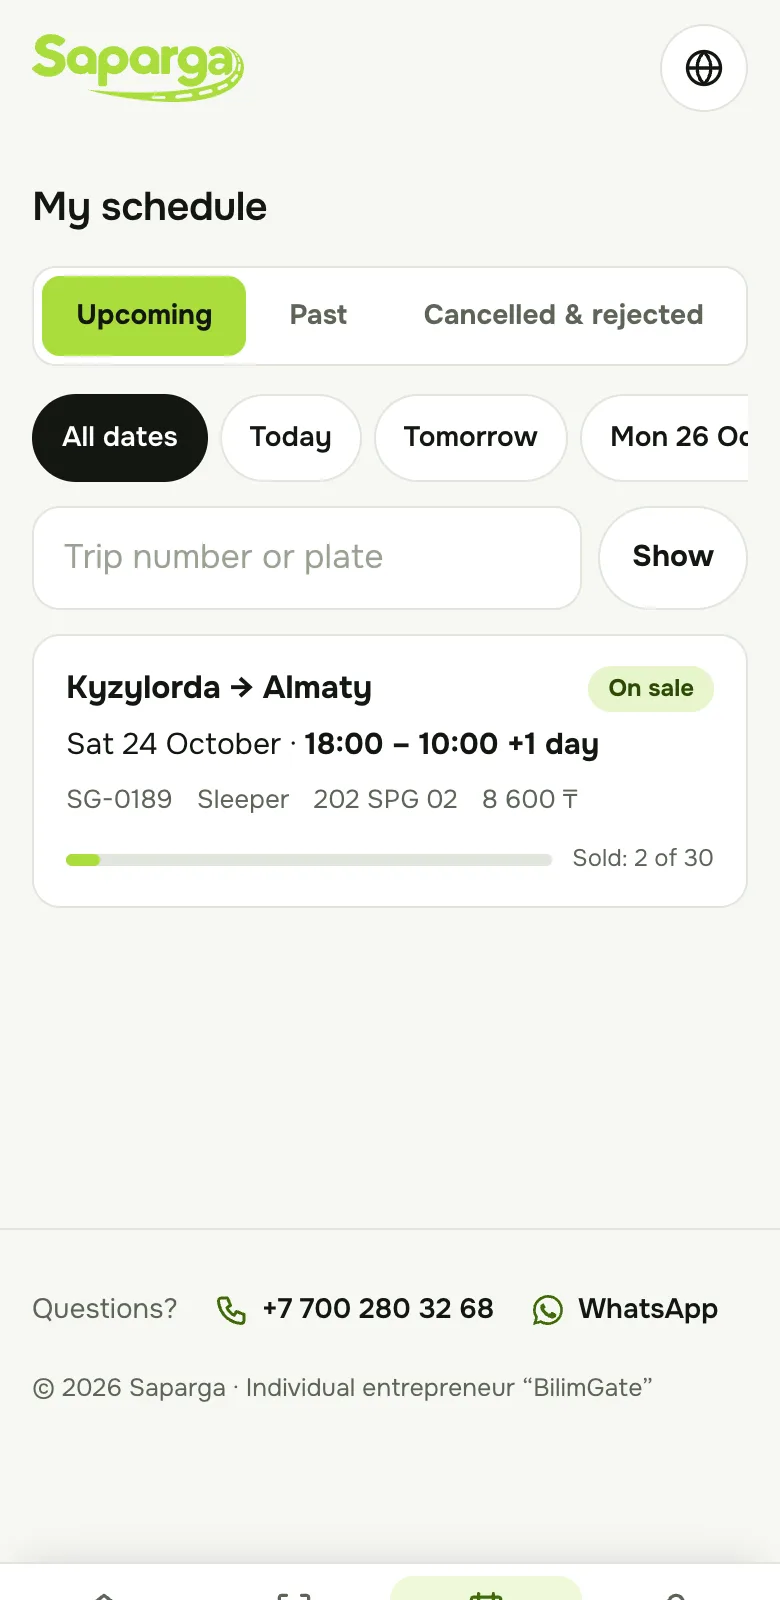
- “Trips” has tabs: “Awaiting approval”, “Upcoming”, “Past” and “Cancelled & rejected”.
- To find trips on a particular day, tap the day above the list: “Today”, “Tomorrow” or a date. “All dates” — back to every day.
- Search by trip number (e.g. SG-0189) or the bus plate number — the “Trip number or plate” field and the “Show” button.
- Each trip card shows: number (SG-…), bus type, plate number, price, driver and a “Sold: …” bar.
| Status | What it means |
|---|---|
| Pending | The trip has been submitted; Saparga hasn't checked it yet. Passengers can't see it yet. |
| On sale | The trip is approved and on sale on the website. |
| Rejected | Saparga didn't approve the trip. The reason is on the trip page (“Reason for rejection”). |
| Withdrawn by the partner | You withdrew the trip yourself before approval. |
| Cancelled | The trip was cancelled after sales began. Passengers were refunded and emailed. |
If a trip is still awaiting approval and departure is close, message or call Saparga support.
C8Withdraw a trip
While a trip is “Pending”, you can withdraw it — for example if the price or time is wrong.
- Open the trip (tap its route in the list).
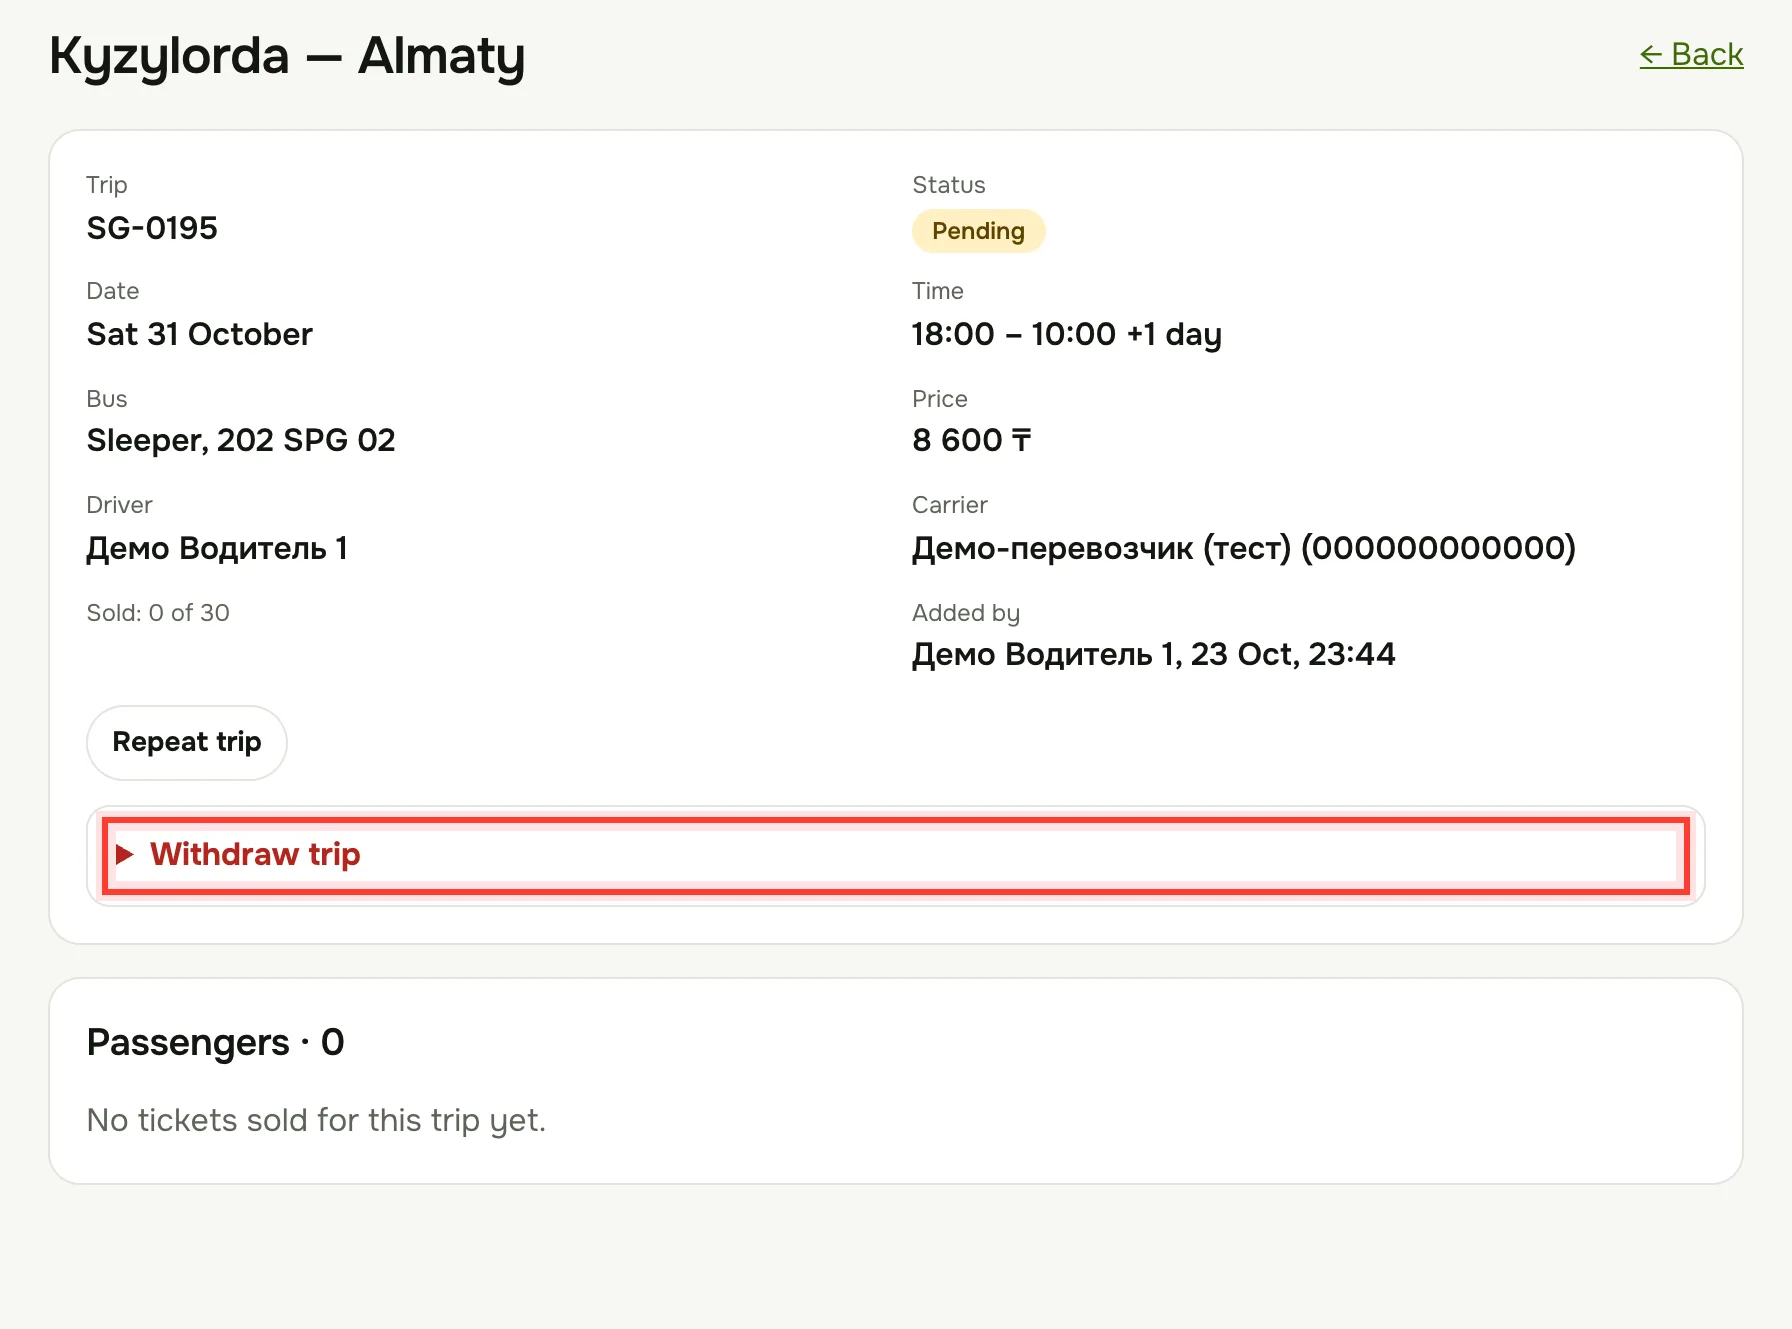
- Press “Withdraw trip” — an explanation opens — and press “Withdraw trip” once more.
- The status becomes “Withdrawn by the partner”. Create the trip again with the right details.
A trip on sale (already approved) can't be cancelled from the account — tickets may already be sold. If the trip won't run, contact Saparga at once: we'll cancel it, refund the passengers and let them know.
C9Trip passengers
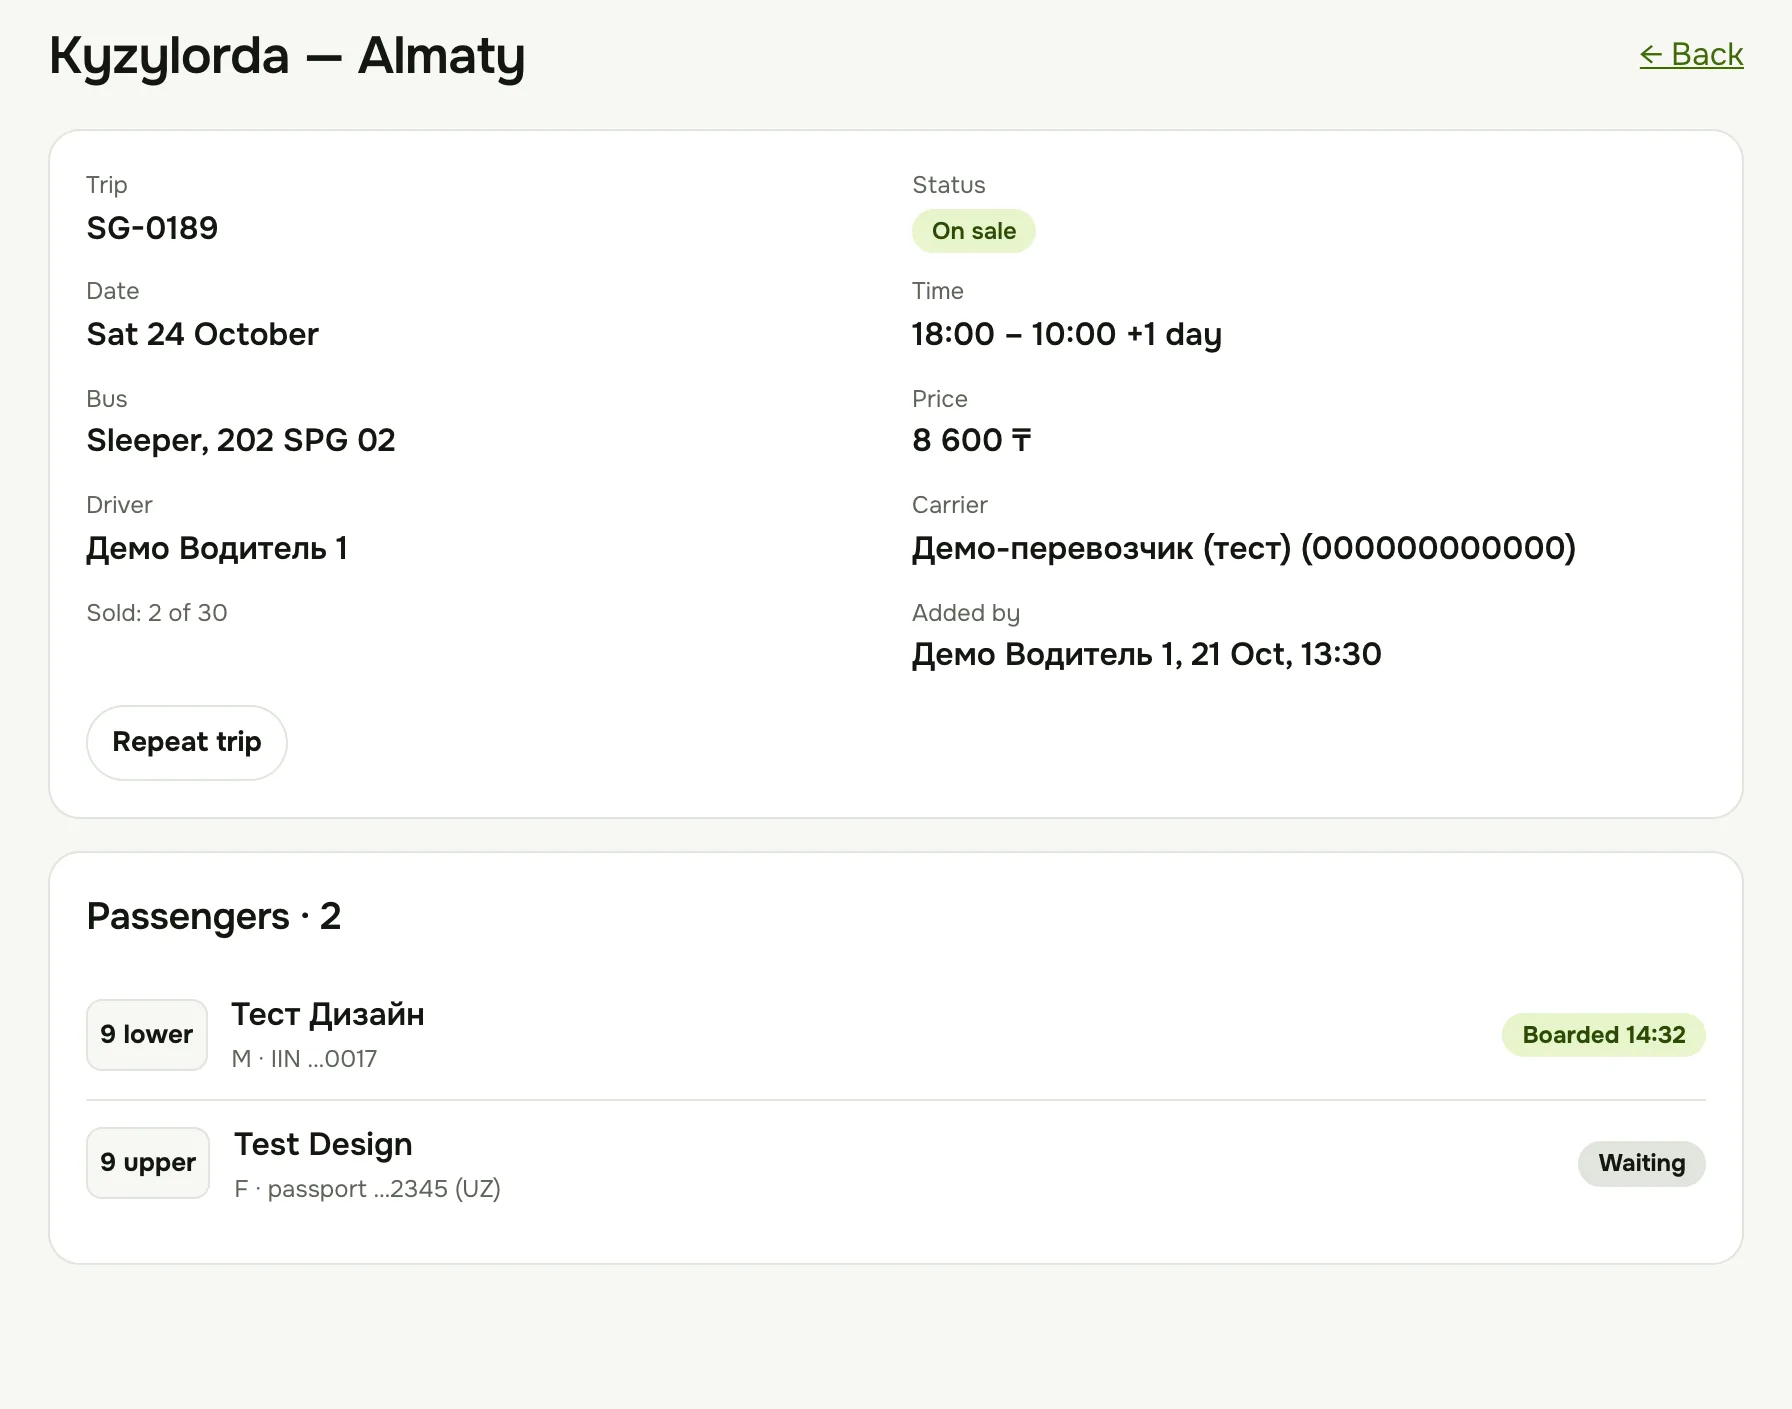
The trip page shows who bought tickets and who has already boarded.
- At the top — the trip details: number, status, date, time, bus, price, driver, seats sold, who added and who checked the trip.
- The “Passengers” box lists paid tickets only: seat, full name, sex and the last 4 digits of the document. On a sleeper bus the berth includes the deck: “7 lower”, “7 upper”.
- “Boarded” with a time — the driver checked the ticket at boarding. “Waiting” — the passenger hasn't boarded yet.
Saparga support handles ticket refunds and passengers' questions.
C10Finance
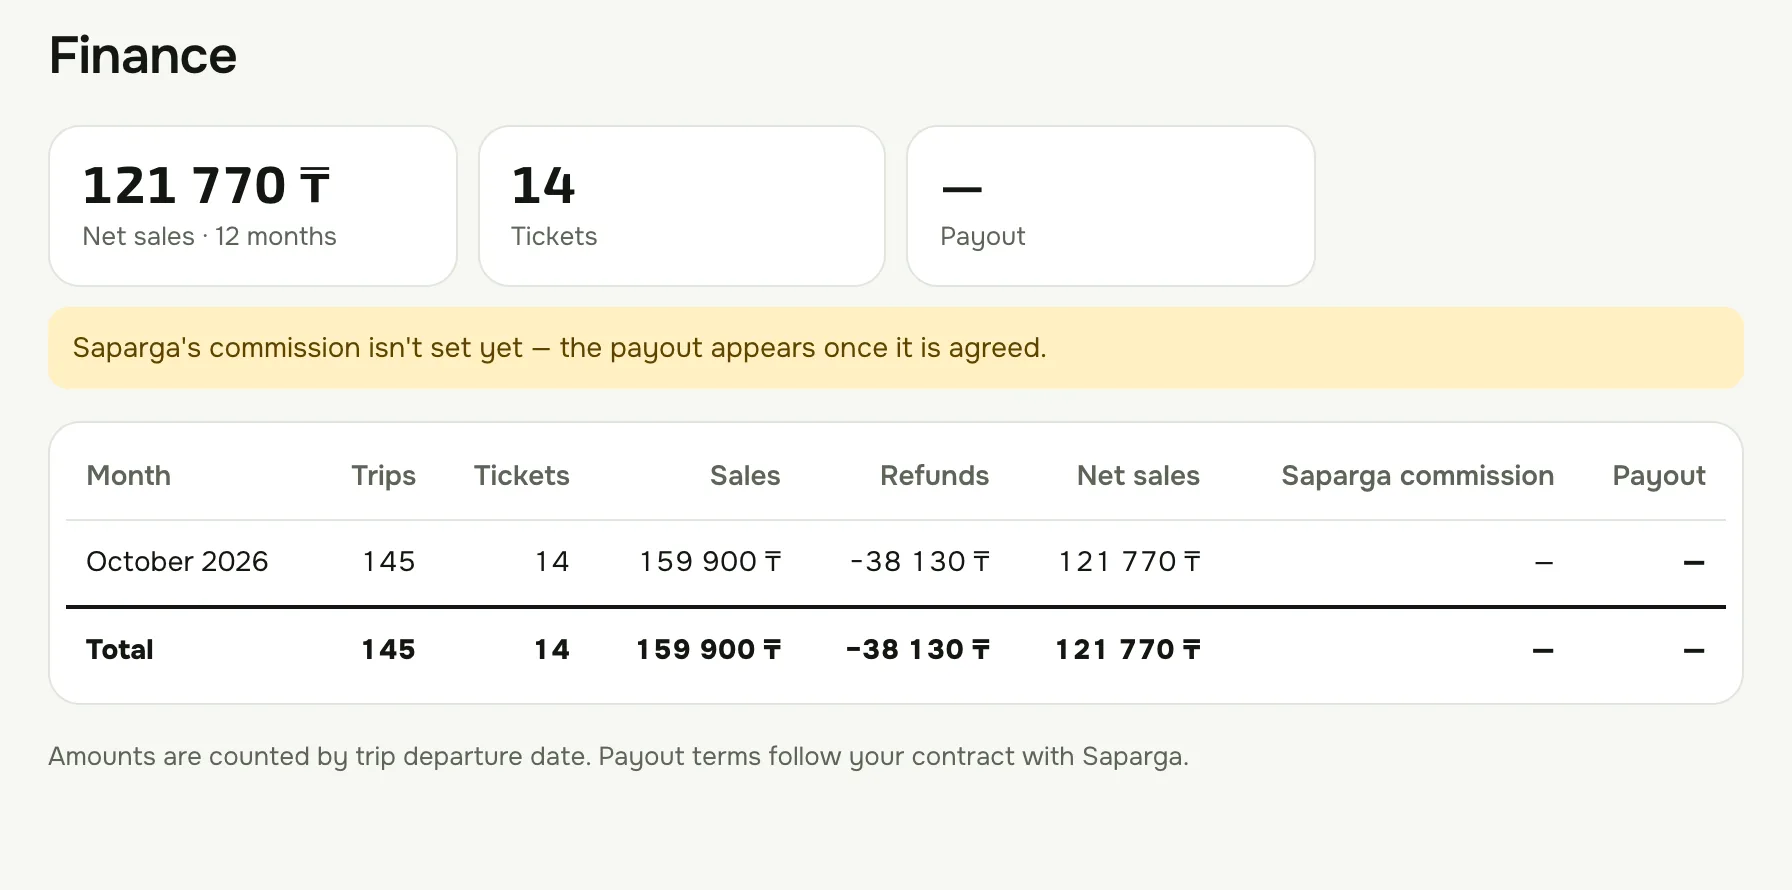
Sales of your trips over the last 12 months, month by month.
- Tiles: Net sales, Tickets and Payout.
- The table shows for each month: trips, tickets, sales, refunds, net sales, Saparga commission and payout. At the bottom — “Total”.
- Amounts are counted by the trip's departure date. How and when payouts are made is set in your agreement with Saparga.
- Until the Saparga commission is set, the payout shows a dash — it appears once the commission is agreed.
C11Profile, password and Face ID sign-in
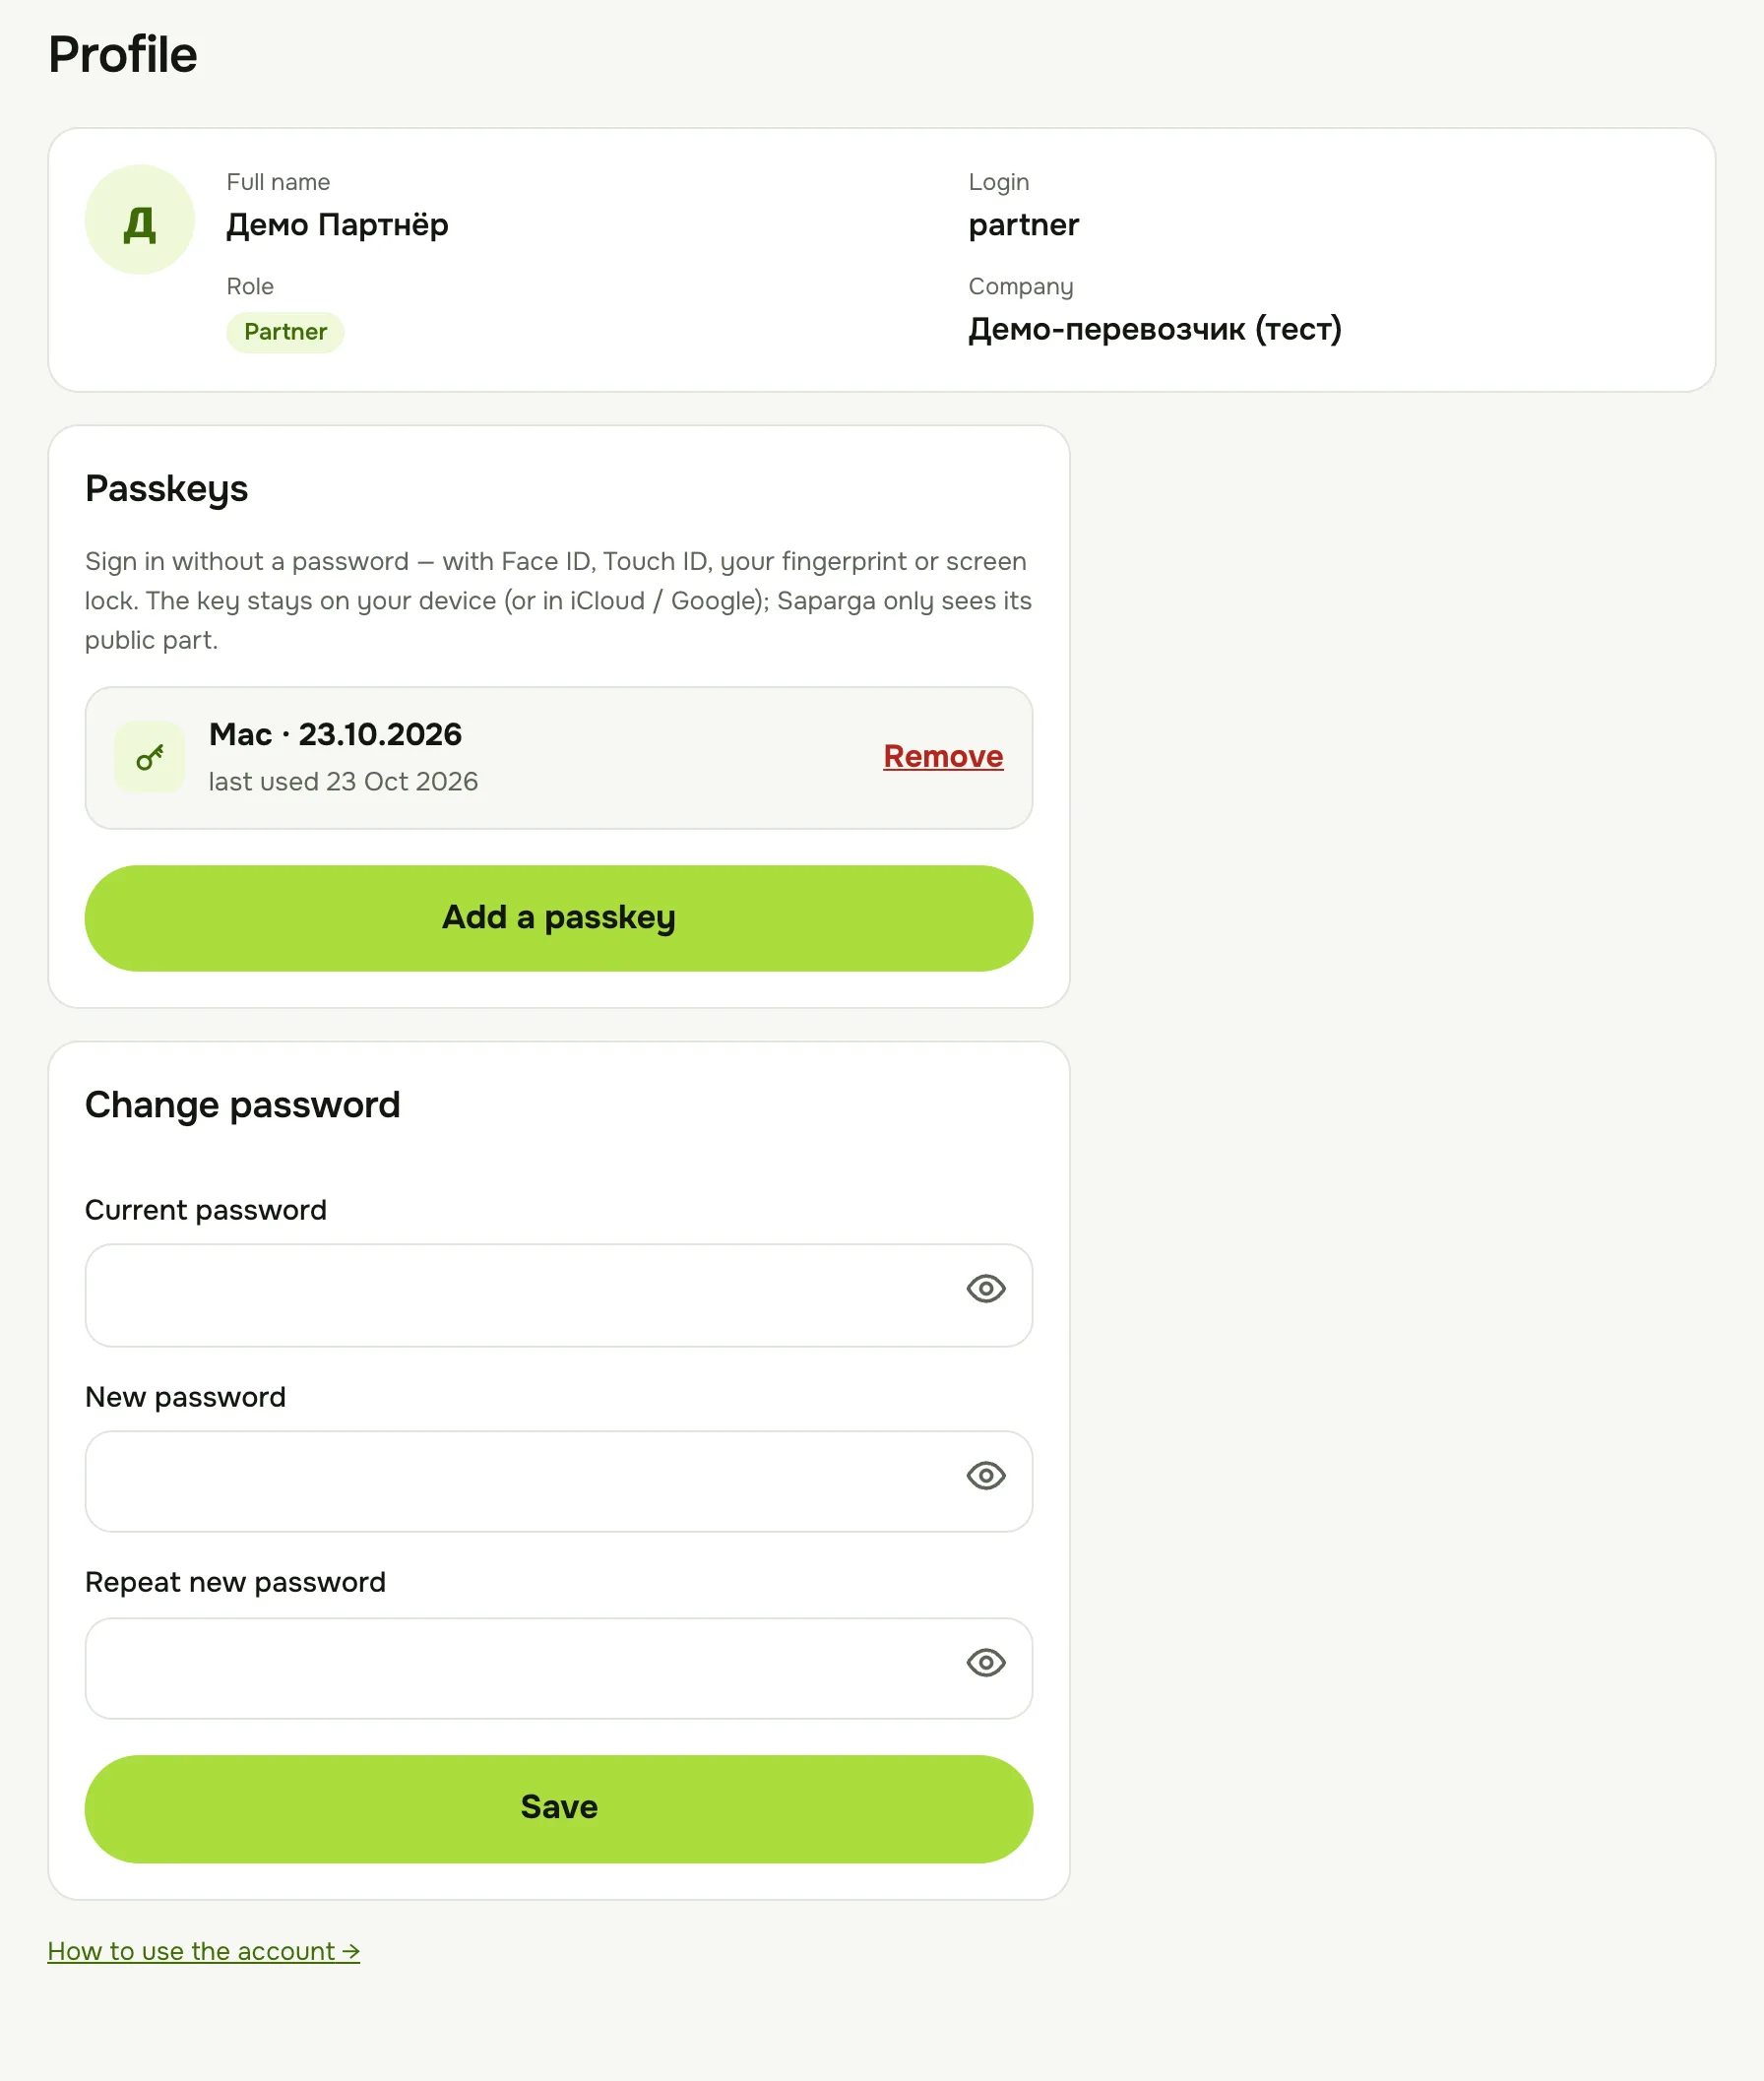
“Profile” shows your full name, login, role and company, and lets you change your password and manage passkeys.
- Open “Profile”.
- Change password: enter the Current password, then the New password (at least 10 characters) and repeat it. Press “Save”. Other devices will then need to sign in again.
- Sign in with Face ID or a fingerprint: in the “Passkeys” box press “Add a passkey” and confirm with Face ID, Touch ID, a fingerprint or your phone's code. Next time, just press “Sign in with a passkey” on the sign-in page.
- Right after a password sign-in the account offers to add a passkey — press “Add a passkey” or “Not now”.
- A passkey belongs to the device (or your iCloud / Google account). Add one on every phone or computer you sign in from.
- Lost your phone? Delete its passkey with “Remove” in the passkey list — it can no longer be used to sign in.
Forgot your carrier password? Contact Saparga support — we'll set a new one. A driver's password is changed by the carrier in “Drivers” (this also removes the driver's passkeys).
Driver account
A driver has four sections: “Home”, “Boarding”, “Schedule” and “Profile”. It works best on a phone — the menu is at the bottom of the screen. Sign in as described at the start: saparga.kz/cabinet, with the login and password from your carrier. Even easier — ask your carrier to show the sign-in QR code and point your phone camera at it.
D1Home: your next trip
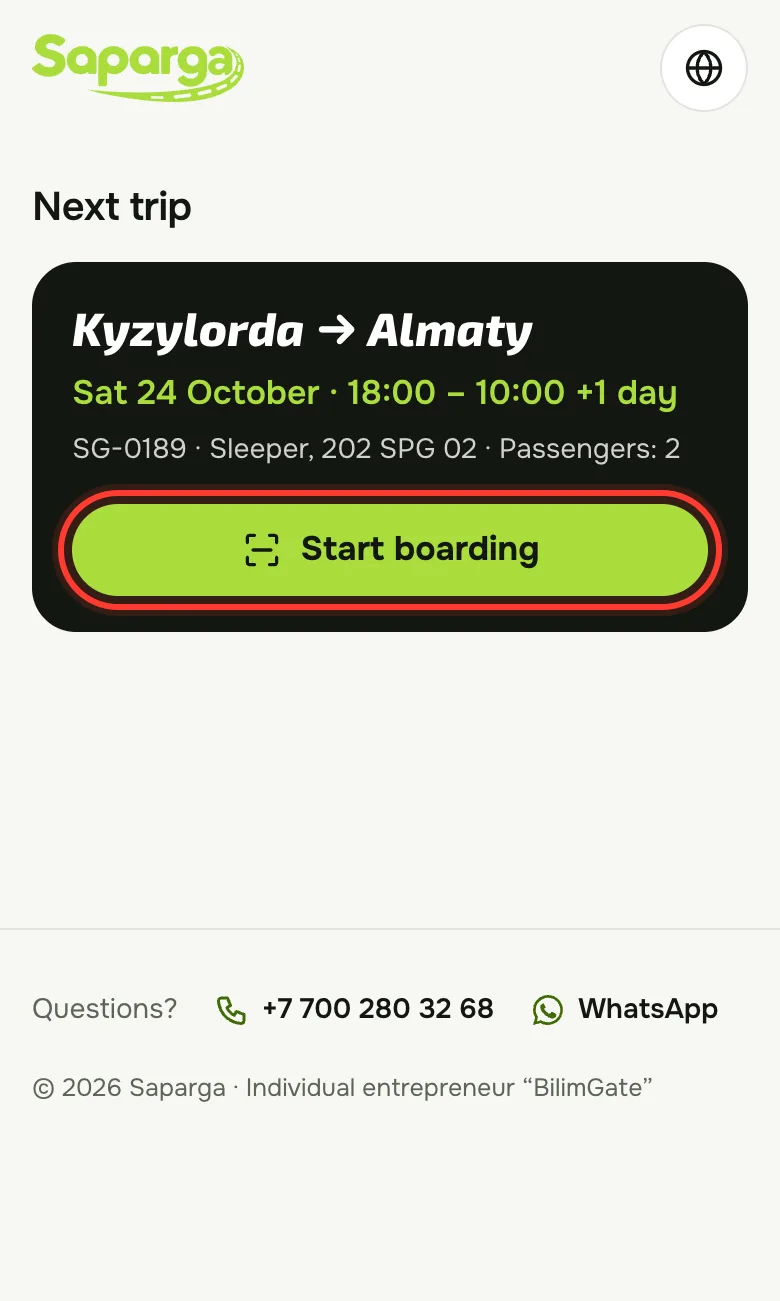
- In large type — your next trip: route, date and time, trip number, bus with plate number and number of passengers. Check that the plate number matches the bus you are driving: passengers see it on their ticket.
- The “Start boarding” button appears 2 days before departure. Until then it says “Boarding opens 2 days before departure”.
- Below — “My schedule”: your next trips.
- Trips are assigned to drivers by the carrier. If you have none, contact your carrier.
D2Boarding: checking tickets
Every passenger has an e-ticket with a QR code (in the email or on their phone). Check every ticket before boarding.
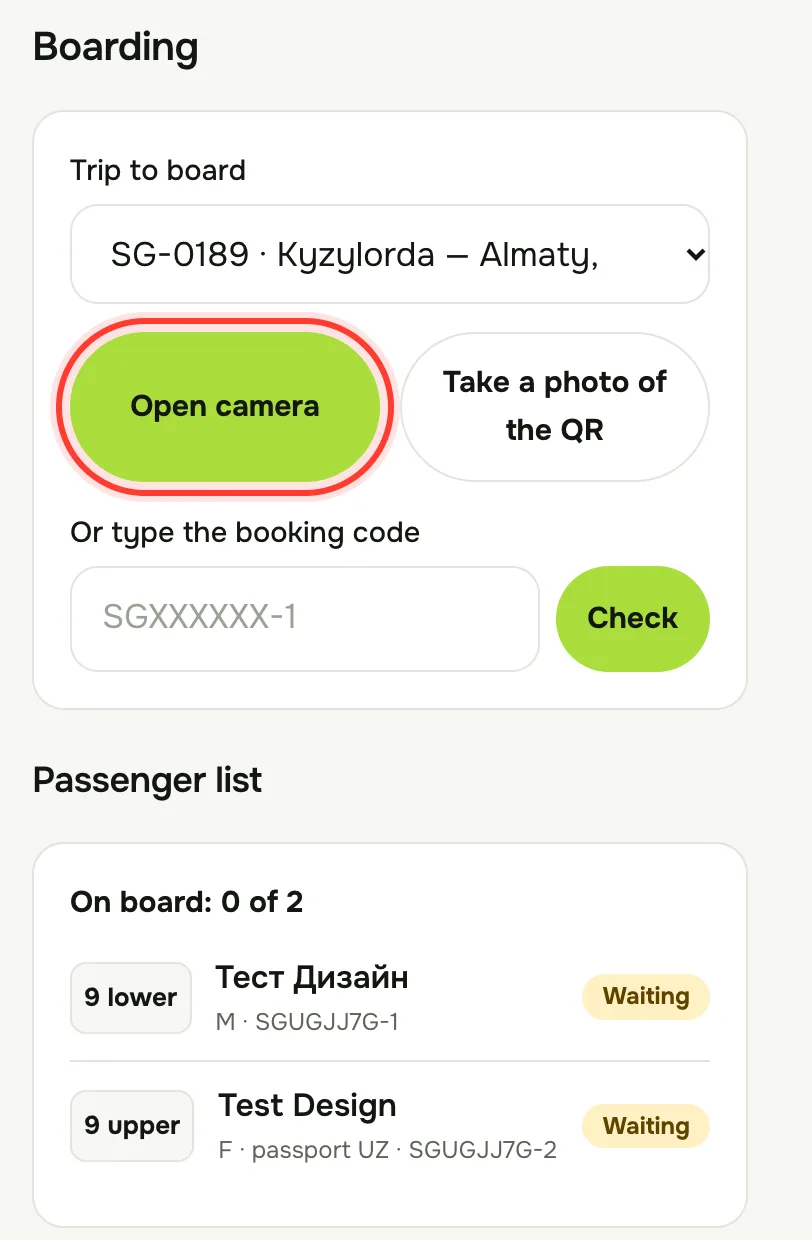
- Press “Start boarding” on the home page or open “Boarding”.
- Check that the right trip is chosen in “Trip to board”. The next trip is chosen for you; another trip opens as soon as you pick it.
- Press “Open camera” and allow camera access. Point the camera at the ticket's QR code — the check happens by itself.
- No camera, or it won't open? Press “Take a photo of the QR” and photograph the code.
- QR code won't read? Type the booking code from the ticket in “Or type the booking code” (e.g. SGQTC7UY-1) and press “Check”.
- Boarding works without internet too. If the connection drops, a yellow note “No internet…” appears — tickets are checked against the passenger list saved on the phone, and “Boarded” marks are sent by themselves when the connection is back (the note shows how many are waiting to send).
- So open “Boarding” in advance, while you have internet, and keep the page open until boarding is over. Offline, the result reads “OK to board (offline)”.
- If one booking has several passengers, each has their own numbered code: …-1, …-2 and so on.
- After every check the phone beeps and vibrates: a short high beep — OK to board; a double beep — ticket already used; a long low beep — boarding with this ticket isn't possible. Sound turns on when you press “Open camera”, “Take a photo of the QR” or “Check”.
D3What the check result means
| Message | What to do |
|---|---|
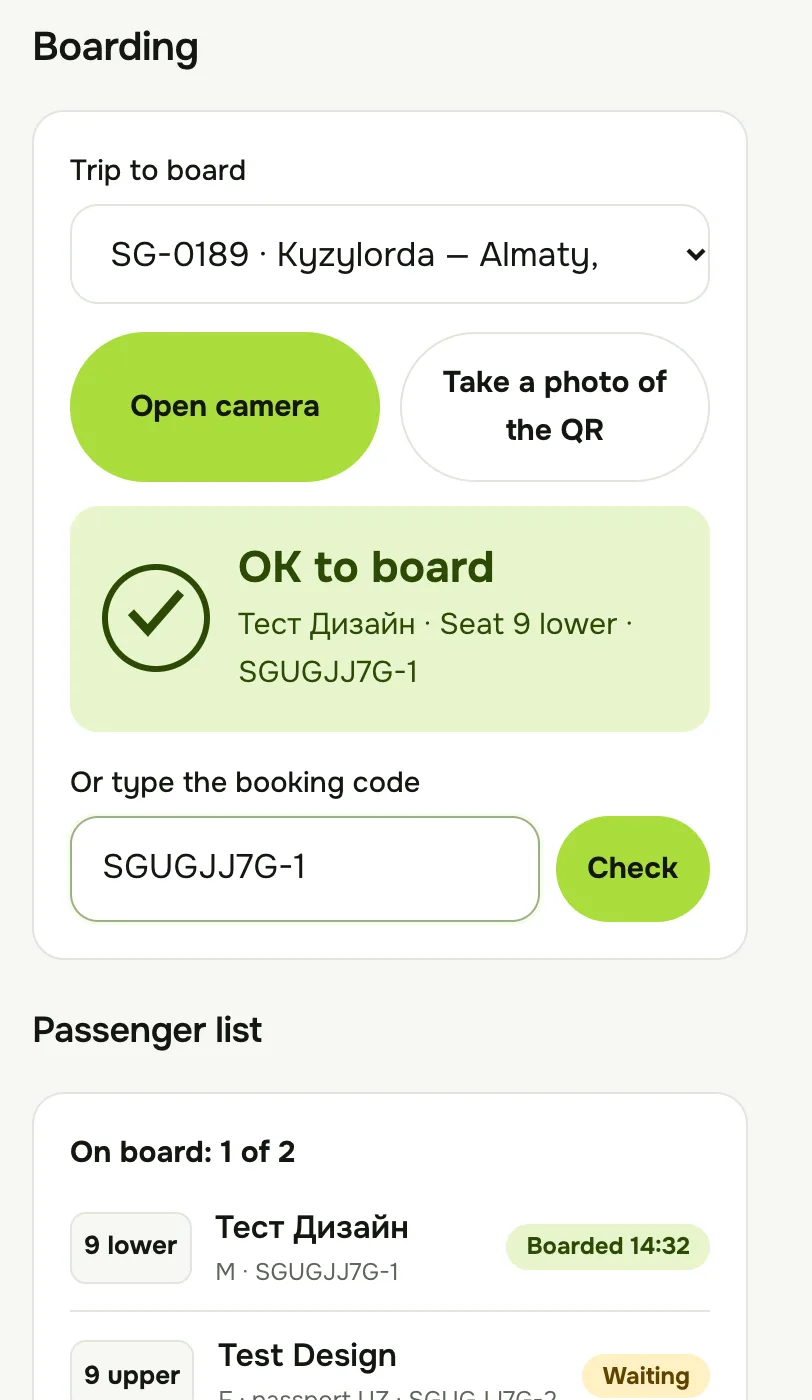
| OK to board | The ticket is genuine, paid and for this trip. The passenger is marked “Boarded”. Check the name and seat. |
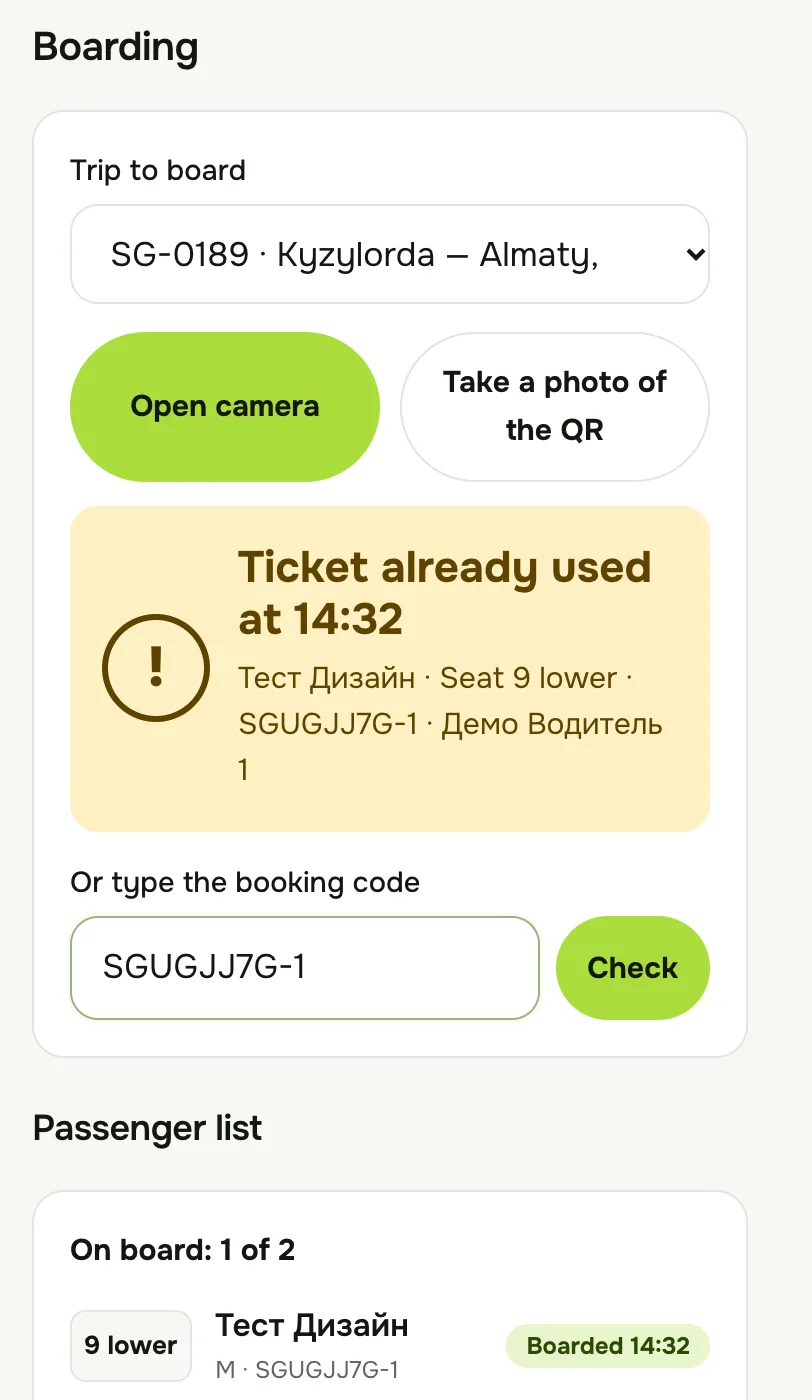
| Ticket already used at … | Someone has already boarded with this ticket (you see the time and who checked it). Don't board with it again. |
| Ticket is for another trip | The ticket is for another date or trip — you see which. It can't be used for this trip. |
| Ticket not paid or refunded | The ticket is not valid. The passenger can contact Saparga support. |
| Fake or damaged ticket | The code failed the authenticity check. Try typing the booking code by hand. |
| Ticket not found | Check that the booking code is typed correctly. |
| OK to board (offline) | No connection, but the ticket is on this trip's passenger list. The passenger is marked — the mark is sent when the internet is back. |
| This ticket isn't on this trip's list | No connection, and there is no such ticket among the trip's passengers. Check the code; if the passenger insists, wait for internet or call support. |
| This booking has several passengers… | Type the code with the passenger's number, e.g. SGXXXXXX-1. |
| Trip cancelled | The trip is cancelled; there is no boarding. |
If anything is unclear, call Saparga support before departure.
D4Passenger list
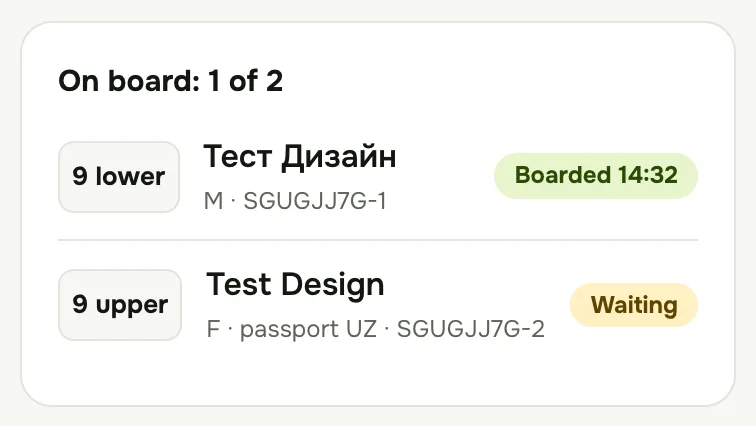
- Under the check — the “Passenger list” of the chosen trip: seat (on a sleeper bus with the deck, e.g. “3 upper”), full name, sex and booking code.
- At the top — “On board: …”: how many of the ticket holders have boarded.
- “Boarded” with a time — the passenger was checked; “Waiting” — not boarded yet. Before departure, see who is missing.
D5Schedule and profile
- “Schedule” — all your trips: “Upcoming”, “Past” and “Cancelled & rejected” tabs, quick day choice (“Today”, “Tomorrow”, …) and search by trip number or plate number.
- Tap a trip to see the details: time, bus, plate number.
- “Profile” — your details and password change (same as for carriers). Forgot your password? Ask your carrier to set a new one.
Need help?
Saparga support helps with signing in, trips, cancellations and passengers' questions. 24/7.